Accountant looking over her invoicing, while on QuickBooks Online Advanced.
Invoicing

Accelerated invoicing with QuickBooks Online Advanced, Part 1: Manual entry

When I first started to dive into QuickBooks® Online Advanced, the power of accelerated invoicing was lost on me. Initially, I was confused about the true value this would provide to my clients, since we had already established memorized transactions for them. Then, I started to think about all of the clients we service who tend to cycle through customers rather quickly. QuickBooks Online Advanced’s unique accelerated invoicing feature provides an elegant solution to this and other issues.

Part 1 of this two-part user guide will:

  • Compare recurring transactions and Advanced’s new accelerated invoicing.
  • Explain the benefits of accelerated invoicing.
  • Show how to access the new Multiple Invoice feature.
  • Discuss what information is required and what information is optional.

Recurring transactions

QuickBooks Online Advanced allows its users to transform a transaction into a memorized transaction for future use. These transactions can then be used whenever the need arises, they can be scheduled to provide a reminder or set for automatic processing. This feature is extremely useful for businesses that have a recurring charge that does not change in price but may vary from customer to customer.

Companies that provide professional services, such as accountants, often use a recurring sales receipt to automate their monthly billing. Such a process requires the QuickBooks Online Advanced user to make a unique invoice per client for it to work correctly. Even if the accountant had numerous clients that had identical billing, recurring transactions require a specific customer name be assigned to each transaction. Depending on how often your client list changes it may be just as time consuming to maintain the recurring transactions each month compared to the time spent using Advanced’s new accelerated invoicing feature.

Accelerated invoicing

While recurring transactions make it possible to automate certain aspects of your invoicing, it is limited by its need for a customer name before saving. Accelerated invoicing helps fill in this gap very nicely by making it possible to invoice multiple companies all at the same time.

QuickBooks Online Advanced provides two different methods to quickly create invoices:

  1. Manually creating multiple invoices
  2. CSV import

This guide deals with the first of these two methods, manually entering multiple invoices. Find more on the second, CSV import method, in Part 2 of this guide.

Multiple Invoices Feature

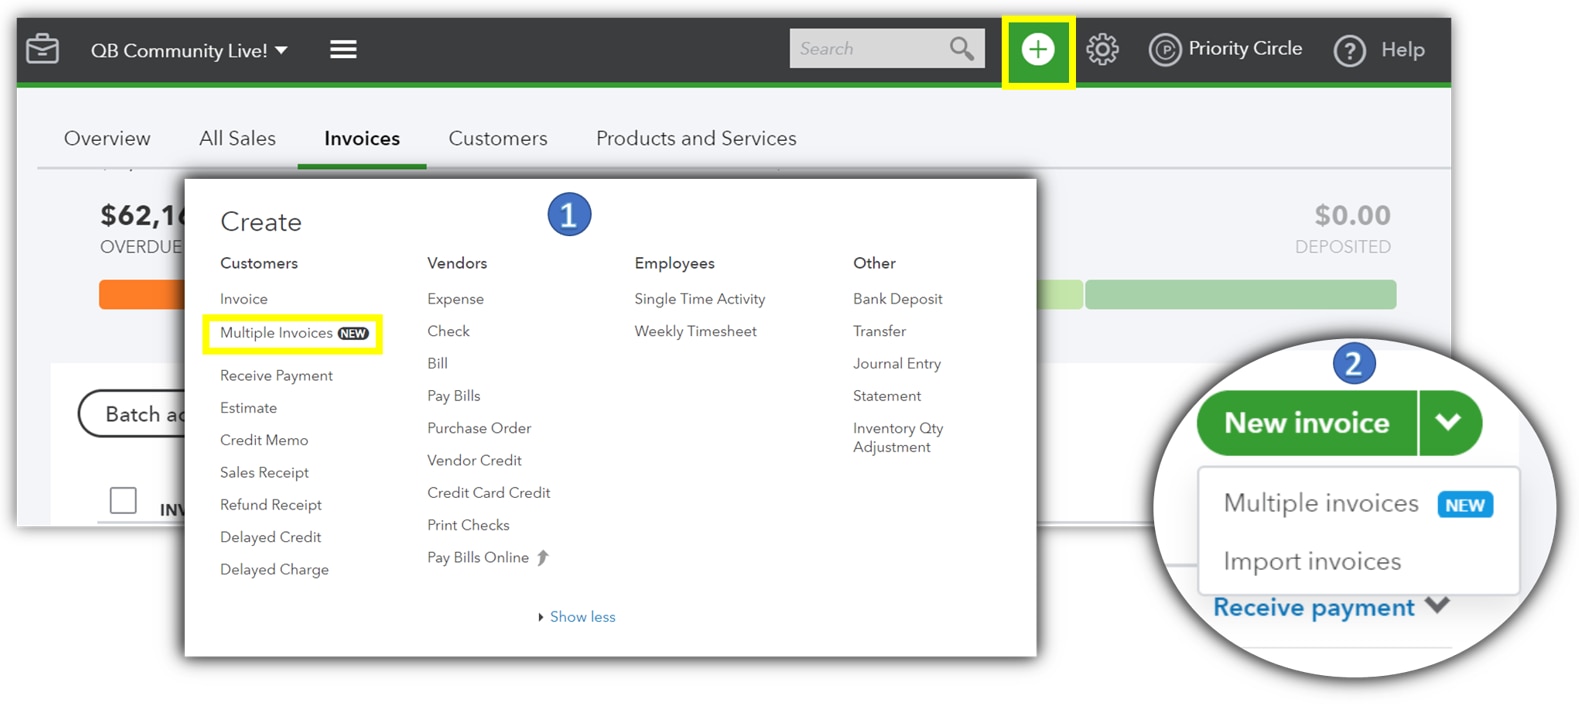
There are two different methods to access this new feature within QuickBooks Online Advanced.

Option 1:

  • Select the “+” sign located on the top toolbar.
  • Select Multiple Invoices under the left column labeled “Customers.”

Option 2:

  • Select Sales from the left side menu.
  • Select Invoices from the top menu in the Sales section.
  • Click on the drop-down arrow next to New Invoice.
  • Select Multiple Invoices on the submenu.

Explaining the data

To use the multiple invoice feature it will be necessary to enter some very specific information. Each of the default custom fields displayed on the Multiple Invoices screen provides additional opportunity to customize the data entry that matches to your needs:

  • Invoice number: You can customize the invoice number by turning on the Custom Transaction Numbers located under the Sales Form Content within the Account and Settings area of the Company Information.
  • Customer: Select the customer or project you wish to invoice. The client that you select will auto populate the email and the terms fields that follow.
  • Email: By setting the email address you will have the option to send the new invoice later.
  • If the email field is left blank and the Send Later box has been checked, it will cause an error when creating the new invoices.
  • Multiple email addresses can be added to this field by separating the addresses with a comma.
  • Terms: If the terms have been set up at the customer level, this information will be automatically populated into the data table. Even when copying another invoice, the customer’s default terms will be displayed.
  • Invoice date: The invoice date will populate with the current date or it can be manually set to any date desired. If the date is customized, any new lines with dates will still populate the column with the current date that day.
  • Due date: The due date will automatically change based on the Invoice Date and the Terms selected for the invoice.
  • Product and service: The product or service that you select here will auto populate the details into the fields listed below. It is possible to manually adjust the values for each separate invoice.
  • Description: This will auto populate with the information added when it was initially set up.
  • Qty: The total quantity being added to the invoice.
  • Rate: The rate per unit will be automatically added based on how it was previously set up.
  • Amount: This will automatically calculate the total quantity X rate per unit.
  • Send later: By selecting this checkbox, you will be able to choose if the invoice should be automatically sent to the customer or if you wish to send it later manually. To use this feature, the email field must be populated, or it will generate an error.
  • Subtotal: The subtotal provides the total of an invoice with multiple line items.
  • Total: The total column is the final amount that the invoice will be created for.

Optional fields available

  • Service date: The service date can be added to each line item if the feature was turned on in the company settings. This makes it possible to bill for more than just a single billing cycle by documenting the date services were provided.
  • SKU: The SKU can be added to distinguish between like items with different features.
  • Class: Every invoice line can be linked to a specific class.
  • Memo: The memo provides an additional place to leave specific notes on that invoice.

Unavailable features with multiple invoices

Currently the following features are not available while using the accelerated invoicing feature within QuickBooks Online Advanced. Intuit expects to continue to work on these features and to add them during future product updates.

  • Attachments
  • Price Rules
  • Multiple Currency
  • Discounts
  • Bundle Items
  • Deposit

Duplicating invoices

The multiple invoice feature allows the user to generate unique invoices as well as duplicate invoices for one or multiple customers. Creating an invoice with multiple line items before creating a duplicate will generate an exact duplicate of the invoice being copied. Below is a breakdown of each of the function displayed in the picture:

Duplicate invoice for multiple customers:

After generating the first invoice on the multiple invoice screen, that invoice can quickly be replicated for numerous customers by selecting a customer from a drop-down list. Service based companies that provide a recurring maintenance program could reduce the amount of time spent billing their customers by quickly selecting customers from their list that need to be invoiced. Another use case might be day care centers or gyms – any business who needs to send the “same or similar” invoice to multiple customers.

Duplicate invoice:

The duplicate invoice will create an exact copy of the invoice being created. The customer on this invoice will be the same as the one being copied. Situations where monthly billing needs to be drafted for the same customer and the same amount could quickly generate multiple copies of the same invoice and modify the invoice date.


New invoice:

The new invoice option will skip to the next line and generate a new invoice. This invoice can then be duplicated by choosing one of the options from the menu again. Companies that have different service levels could use this function to create one invoice, replicate it for a group of customers, and then create a second invoice which could be replicated to a second group of customers.

New line item:

There are three ways to add an additional line to the same invoice, by selecting this option from the popup menu, hitting “Shift+enter” on the keyboard, or selecting the “+” sign in the cell below the initial product selected. When you add a new line item you will notice the date and customer lines will be grey out. To delete a line item, simply select the ““ sign located in the line that you wish to remove.


Delete invoice:

Much like adding an invoice, this function will quickly delete any unwanted invoices that were added to the data table. This function only works to remove invoices before they have been added into QuickBooks Online Advanced.

In Part 2 of this user guide about the new accelerated invoicing feature, we will focus on the CSV invoice import feature for QuickBooks Online Advanced.


Get the latest to your inbox

Get the latest product updates and certification news to help you grow your practice.

By clicking “Submit,” you agree to permit Intuit to contact you regarding QuickBooks and have read and acknowledge our Privacy Statement.

Thanks for subscribing.

Relevant resources to help start, run, and grow your business.

Looking for something else?

Get QuickBooks

Smart features made for your business. We've got you covered.

Tax Pro Center

Expert advice and resources for today’s accounting professionals.

QuickBooks Support

Get help with QuickBooks. Find articles, video tutorials, and more.

How can we help?
Talk to sales 1-800-497-1712

Monday - Friday, 5 AM to 6 PM PT

Get product support