Accountant holding invoicing options in his hands.
Invoicing

Accelerated invoicing with QuickBooks Online Advanced, Part 2: Importing invoices

QuickBooks® Online Advanced has dramatically improved the invoicing process by adding a CSV import function. This new function is very powerful for companies that use a third-party point of sale or customer invoicing system. In Part 2 of our Accelerated Invoicing with QuickBooks Online Advanced user guide, we will focus on the best practices when importing invoice data into Advanced.


Part 2 of this two-part user guide will:


  • Compare recurring transactions and Advanced’s new accelerated invoicing.
  • Give an overview of the CSV Import function within accelerated invoicing.
  • Share important notes before importing your data.
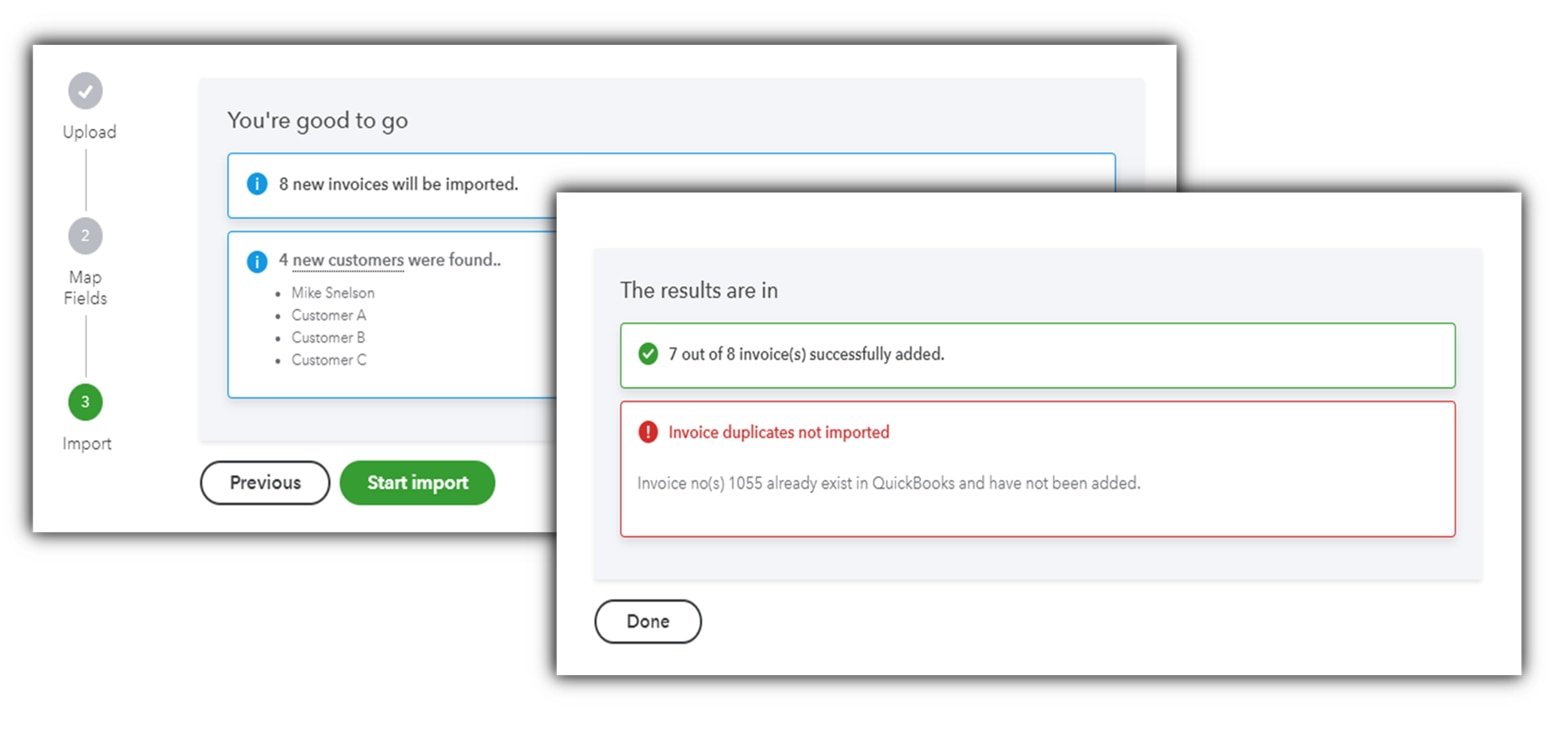
  • Show how to access the CSV import option, including a step-by-step guide to complete the import.
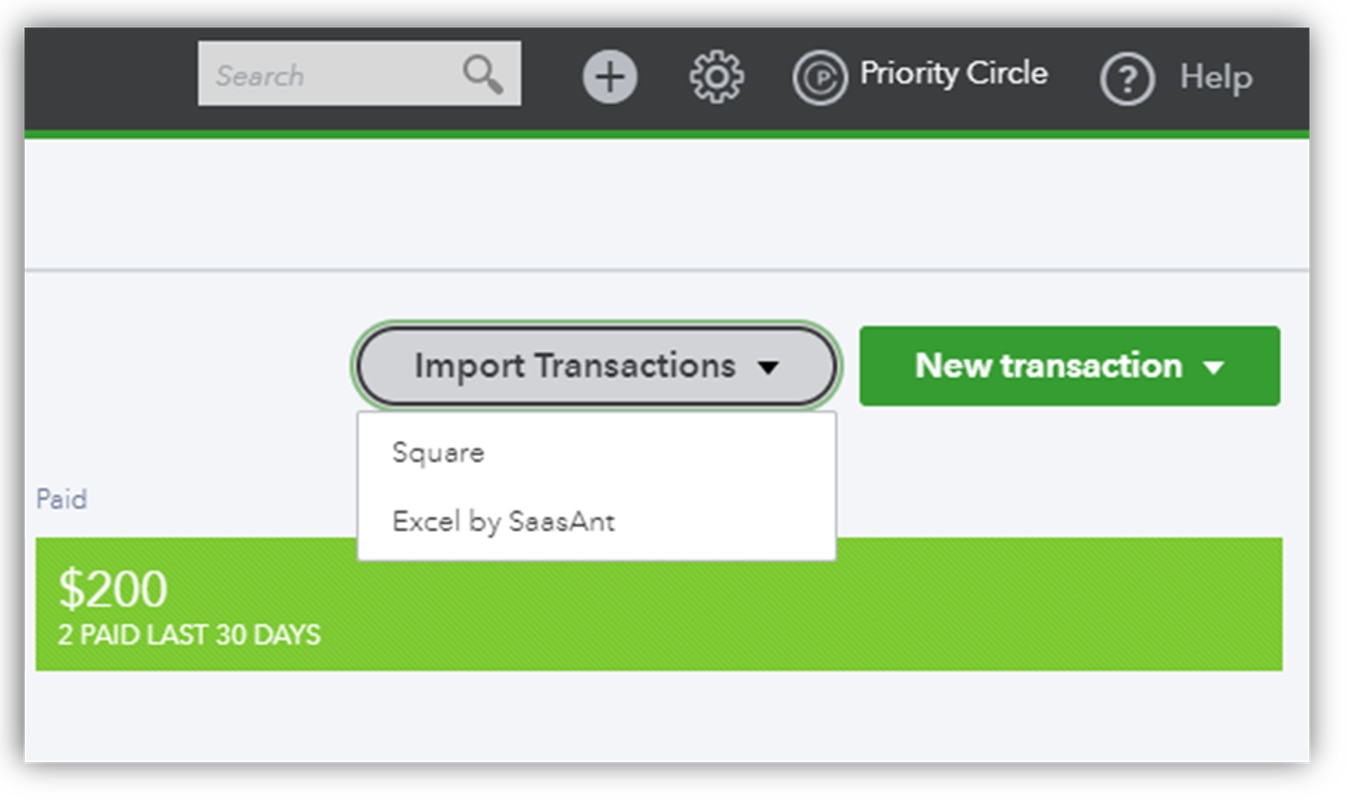
  • Discuss third-party alternatives for invoice importing.

Recurring transactions

QuickBooks Online Advanced allows its users to transform a transaction into a memorized transaction for future use. These transactions can then be used whenever the need arises, or they can be scheduled to provide a reminder, or for automatic processing. This feature is extremely useful for businesses that have a recurring charge that does not change in price but may be different from customer to customer.


Companies that provide professional services, such as accountants, often use a recurring sales receipt to automate their monthly billing. Such a process requires the QuickBooks Online Advanced user to make a unique invoice per client for it to work correctly. Even if the accountant had numerous clients that had identical billing, recurring transactions require a specific customer name be assigned to each transaction. Depending on how often your client list changes it may be just as time consuming to maintain the recurring transactions each month compared to the time spent using Advanced’s new accelerated invoicing feature.


Accelerated invoicing

While recurring transactions make it possible to automate certain aspects of your invoicing it is limited by its need for a customer name before saving. Accelerated invoicing helps fill in this gap very nicely by making it possible to invoice multiple companies all at the same time.


QuickBooks Online Advanced provides two different methods to quickly create invoices:


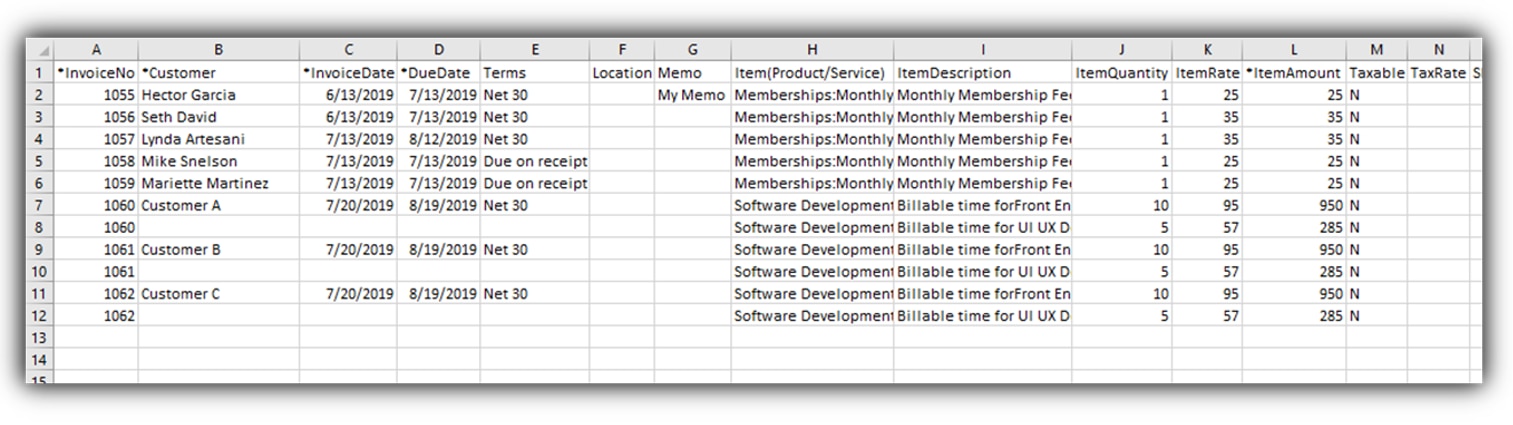
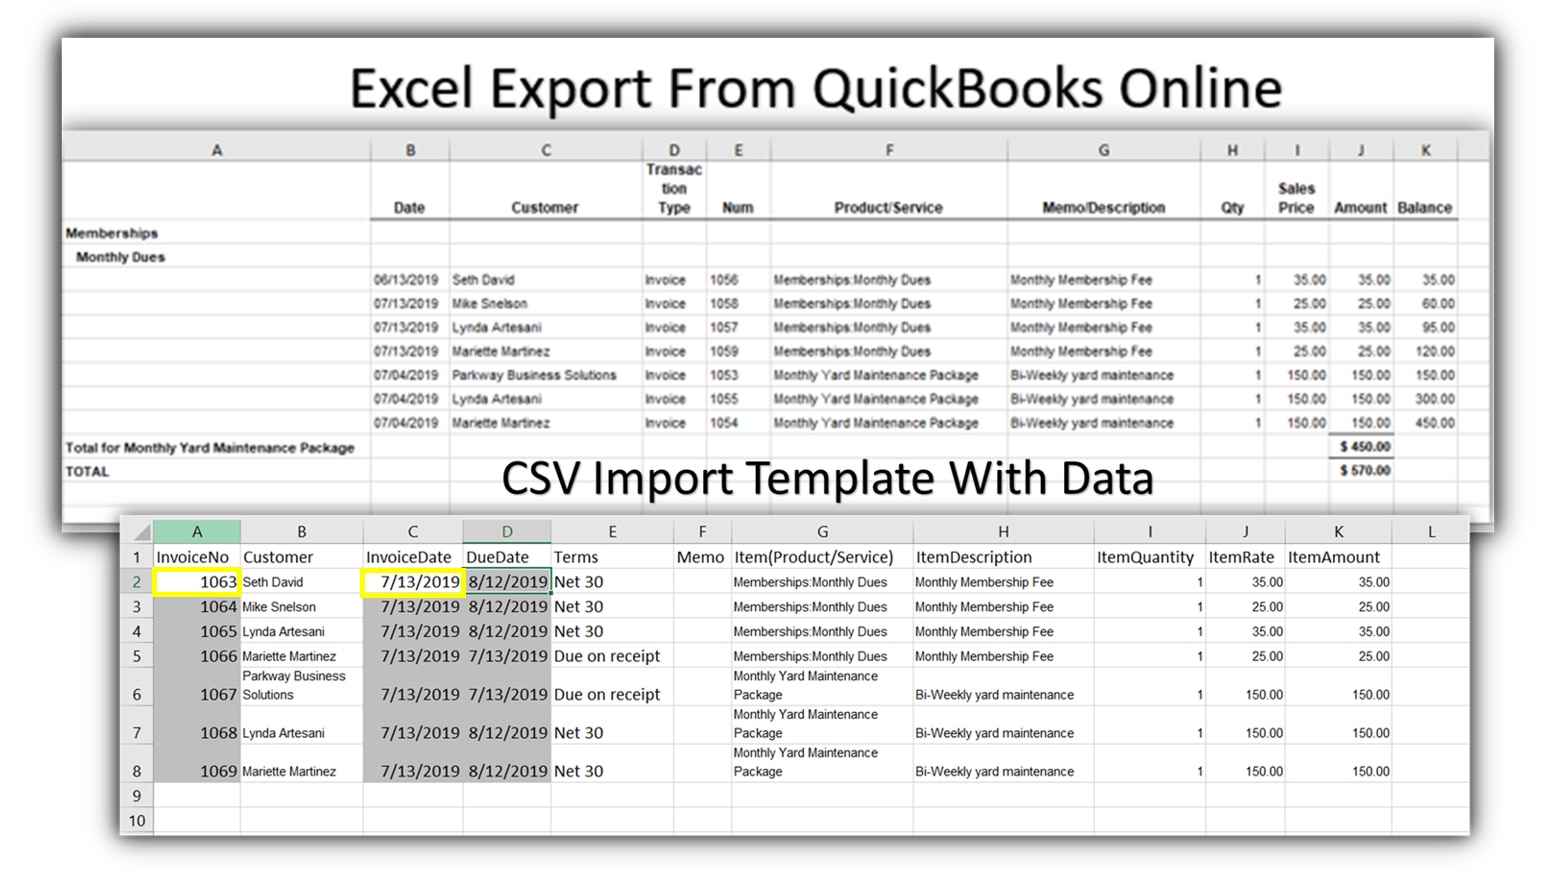
  1. CSV import (download sample file here)
  2. Manually creating multiple invoices

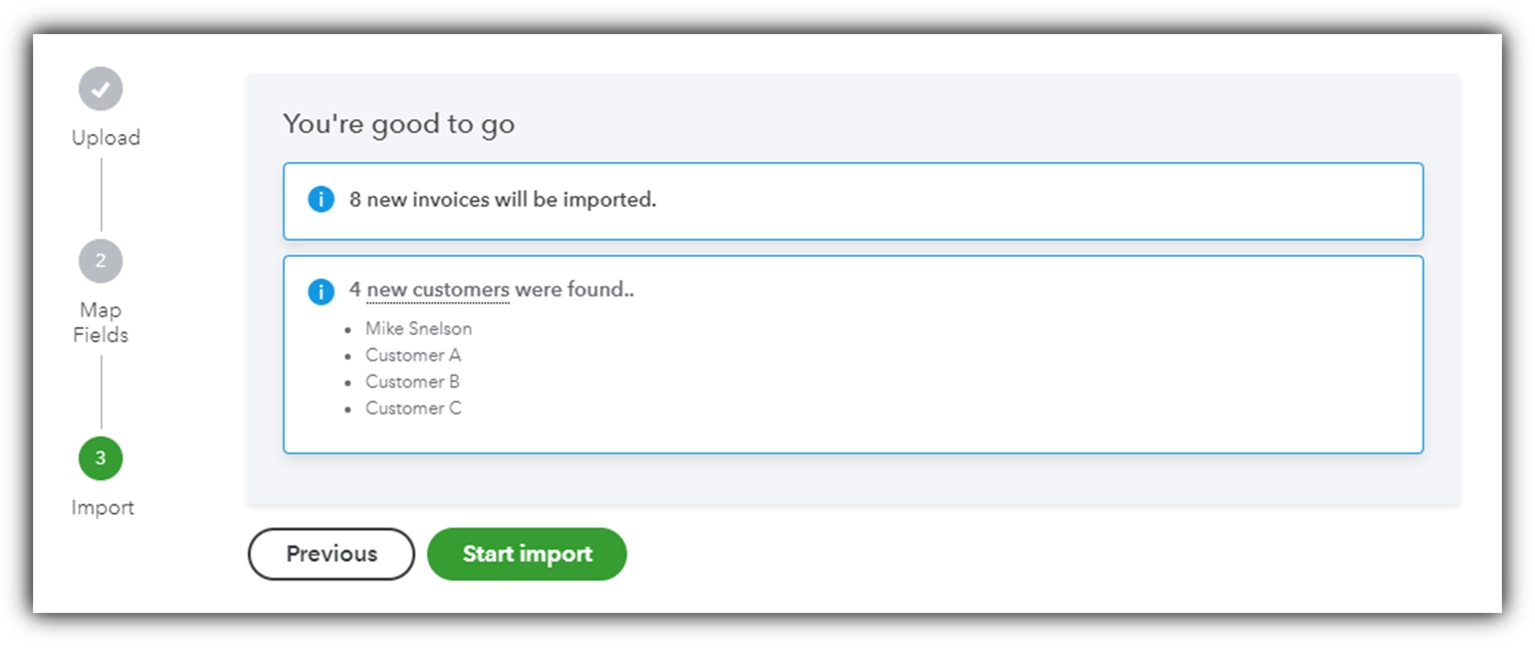
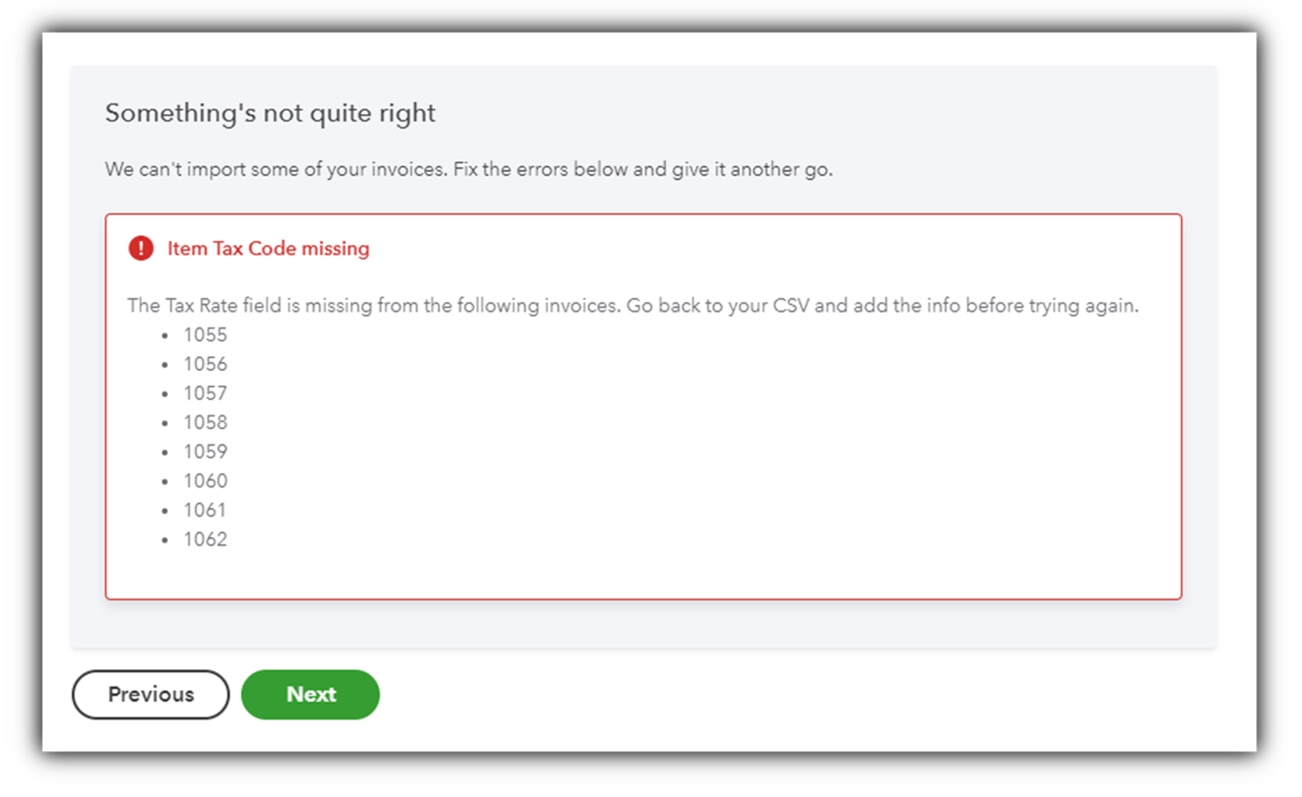
Part 2 of our Accelerated Invoicing with QuickBooks Online Advanced user guide deals exclusively with importing multiple invoices via CSV files. Find more on manual multiple invoice creation, find Part 1 of this guide here.


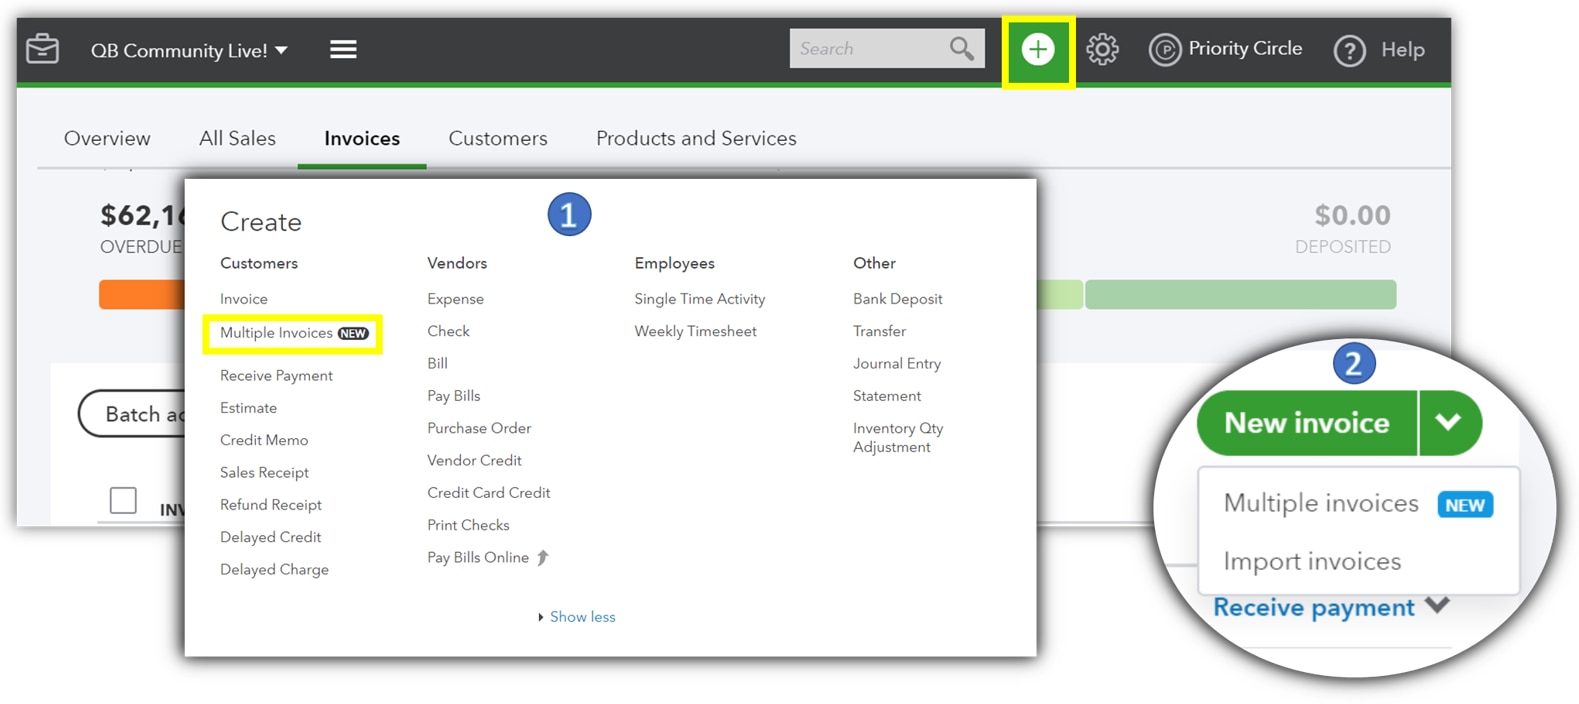
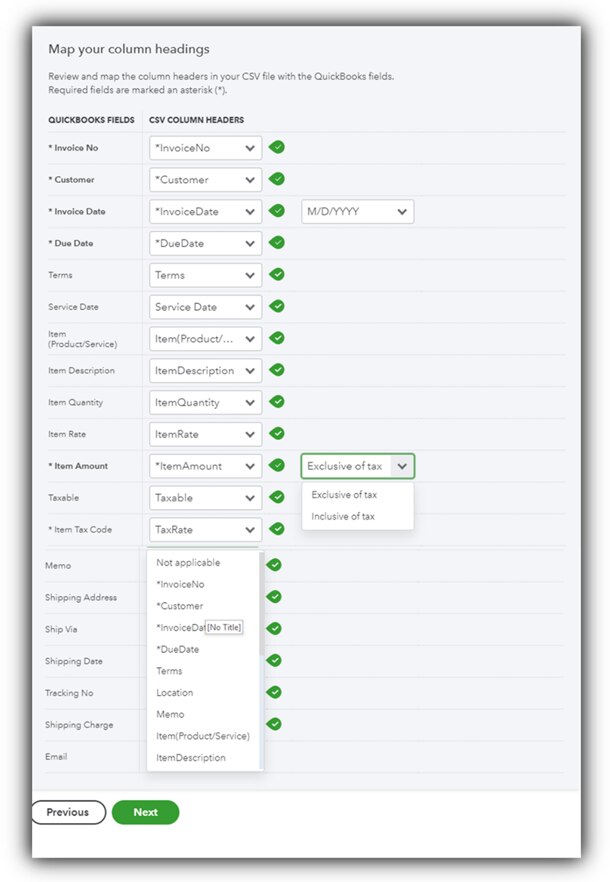
How to access the CSV import feature:

Unlike the multiple invoicing feature, the only place to access the import function is directly from the Invoices tab after selecting Sales from the side menu. Once selected, a new window will be displayed where you can download a sample CSV file and an Import Guide.

Important notes before importing

Overall, the import process is very easy but there are a couple of important tips to follow to be more successful.

CSV File: The CSV file must include the following columns to be able to import:

  • Invoice Number
  • Customer
  • Invoice Date
  • Due Date
  • Item Amount

Products and services: Any products and services that are used within your CSV import must already be listed and active inside of your company file. If an item does not exist, you will receive an error notification.

Customers: If a customer does not already exist within your company file, QuickBooks Online Advanced can create a new customer for you by selecting the “Add New Customers to QuickBooks” checkbox. Be careful that all names listed in your import file are spelled correctly to avoid creating new customers by accident.

1000 Line Item Limit: QuickBooks Online Advanced allows CSV files that contain up to 1000 lines to import into their software. If your file has more than 1000 lines of data, it will be necessary to split the import into multiple parts.

Invoice Numbering: Custom transaction numbers can be used during the import process if the feature has been enabled within the company settings. Be careful not to accidentally create invoices with duplicate transaction numbers.

Taxable: If the items you sell are taxable, an additional column will be displayed so you can select the correct tax rate for that invoice. If everything is non-taxable, it is easier to remove both the Is Taxable and Tax Rate columns.

Import the CSV file

During the import process, the on-screen guide will help you walk through the process and warn you of any challenges that kept the import from completing. Each of the images displayed above demonstrates a possible error message that you might receive.

Step 1: Review & import data

Select the file that you wish to import into QuickBooks Online Advanced. Review the data before importing the file.

Step 2: Map your column headings

If you used the template file to structure the invoice data that will be imported, most of the columns should automatically be matched for you. If you used a CSV file from another third-party application, this step will allow you to map the correct column headings from that file to the fields that QuickBooks is looking for. Best practice is to download the template and use that while importing.

Invoice date: The additional drop-down column allows you to map out the date format that has been used in your company file.

Item amount: This column requires you to select if the amount includes or excludes the total sales tax on the item being sold.

Inclusive of tax: The sales tax has been bundled up with the item price. An item that is $100.00 at a tax rate of 7.25% would mean that the product was $93.24, and the sales tax was $6.76.

Exclusive of tax: The sales tax has not been calculated into the total price of the item. An item that is $100.00 at a tax rate of 7.25% would mean that the product was $100.00, and when the sales tax was added, the total sale was $107.25.

Step 3: Import data

After mapping the column headers, a new review screen will be displayed notifying you of any errors the file may have. If no errors exist, a summary of the total number of invoices to be imported as well as the number of customers to be created will be displayed. Select the Start Import button to initiate the import. After a few moments, the results screen will be displayed for you to review.

Exploring alternative options

Recently QuickBooks Online added in application links for a small number of companies, among these were Square and SaaSAnt. Each of these applications makes it possible to import invoice details into the program, however each have their own challenges and usually require an additional paid subscription to make them work.

Square: The Sync with Square application is free of charge, however the data that is pulled into QuickBooks Online is not easy to reconcile due to merchant fee deductions.

SaaSAnt: SaaSAnt has quickly become a ProAdvisor favorite thanks to its ability to import most transaction types into QuickBooks Online. Their pricing structure is very reasonable starting at $10.00 per company file. The primary drawback when using SaaSAnt is the required learning curve.

CData: CData happens to be my preferred importing tool due to all the functionality it provides with QuickBooks Online. Unfortunately, all that power comes with the most time-intensive learning curve if you wish to become efficient enough to use it every day. My primary difficulty with CData is how difficult it is to import multiple line items on a single invoice.

Parkway ProAdvisor tip: Turbo charge your Accelerated Invoicing

If the new accelerated invoicing feature is still not fast enough for you, give this trick a little try!

Service based companies with monthly maintenance plans or SaaS based software companies that consistently invoice their customers the same amount month after month can create a custom import template with all of their standard customers listed so they can easily be imported each month in a fraction of the time.

Here is how we create the custom CSV import file:

STEP 1: Create a “Sales by Customer Detail” Report in QuickBooks Advanced Online.

STEP 2: Customize the report as follows:

  • Add a column with Customer Name.
  • Filter Products and Services for the items you want to invoice for.
  • Remove the Header and Footer Information from the report.

This report will provide you the customer names that match perfectly to what you are going to invoice for as well as product or service that you will be selling and the price it will be sold at.

By removing the header and footer information from the report before you export it to excel, it will be easier to grab the data you need.

Step 3: Download the CSV Template provided by Intuit and open it in Excel.

Step 4: Copy and paste the following columns of information into the CSV Template

  • Customer
  • Product/Service
  • Memo/Description
  • Qty
  • Sales Price
  • Amount

There are two fields that you will need to update each time you go to use the excel document, the Invoice Date and the Invoice number.

Step 5: Determine the next available invoice number in your invoice sequence and enter the invoice number into cell A2

Step 6: Determine the date you want on all of the invoices and enter the invoice date into cell C2

Step 7: Setup the following formulas into the designated cells on the CSV Import sheet. The cells that have formulas have been filled with color to help you understand where they go. After saving the formulas, you can save this file as an excel template to be reused as often as you wish. Follow the previous instructions to complete the import process and you are all done!

I hope Part 2 of this guide helps you fully understand when and how to use the importing option of QuickBooks Online Advanced’s unique accelerated invoicing feature to benefit your clients. In Part 1 of this Accelerated Invoicing with QuickBooks Online Advanced user guide we focus on manual entry.


Get the latest to your inbox

Get the latest product updates and certification news to help you grow your practice.

By clicking “Submit,” you agree to permit Intuit to contact you regarding QuickBooks and have read and acknowledge our Privacy Statement.

Thanks for subscribing.

Relevant resources to help start, run, and grow your business.

Looking for something else?

Get QuickBooks

Smart features made for your business. We've got you covered.

Tax Pro Center

Expert advice and resources for today’s accounting professionals.

QuickBooks Support

Get help with QuickBooks. Find articles, video tutorials, and more.

How can we help?
Talk to sales 1-800-497-1712

Monday - Friday, 5 AM to 6 PM PT

Get product support