Pinpointing custom fields in QuickBooks Online Advanced.
accounting

5 steps to using custom fields in QuickBooks Online Advanced

At first glance, it’s easy to miss all the new features hiding inside QuickBooks® Online Advanced, but once you dive in and start taking advantage of the new tools, you will never look back again. Now, one year after launch, we have a couple of clients that we purposely upgraded to the new offering … and they are loving it.

The new custom fields option has quickly become the favorite feature among our clients using QuickBooks Online Advanced, but like any tool, it is important to understand how and when to use it. This five-step guide will take you through a deep dive of this powerful feature as we define the different field types by providing use cases.

Getting started: Select what to track

When adding a new custom field to track additional data, you must first choose the data type (custom field type) you would like to use (see Step 1):

  • Text and Number
  • Number Only
  • Date
  • Dropdown List

After selecting the type and category of field, it is time to select which forms you want to use your new custom field and if they should be visible on printed documents (see Step 3).

Sales:

  • Sales Receipts
  • Estimates
  • Invoices
  • Credit Memo
  • Refund Receipts

Purchases:

  • Purchase Orders
  • Expenses
  • Bill
  • Check
  • Vendor Credit
  • Credit Card Credit

Step 1: Understanding the four custom field options

Before we can dive deeper into some of the specific use cases we have established for our clients, let’s review each of the different field types and suggest a use case for each one.

#1 – Text & Number field: Since the introduction of the custom fields into QuickBooks Online, the text field has been the standard field available for everyone to use. This field type allows the user to type anything; unfortunately, that freedom also causes reporting errors caused by accidental typos.

Without the ability to bulk update custom fields on transactions, QuickBooks requires the user to make changes one transaction at a time. Any errors in data that require the custom field data to be cleaned up before generating reports will find this task very time consuming.

Additional use cases:

  • Using the text field to track referred by for customer referrals.
  • Service companies can use the field to reference cross street.
  • Companies that wish to see the customer contact number on an estimate or invoice can use the text field to add the information on the document. 

#2 – Custom number field: When the number-based custom field is selected, QuickBooks Online will only allow numbers “0-9” and a “.” to be entered. In addition, only one “.” is permitted within the field which can hold up to 15 digits.

When the number field is used in custom reporting, reports can be filtered by selecting values that are:

  • Equal to
  • Greater Than
  • Equal to or greater than
  • Equal to or less than
  • Less than

While working with a mortgage company that needed to track the value of each home being funded for monthly reporting to the state, the number field made it possible for us to control the format of the data that was being entered. In this specific use case, we used a custom drop-down field to select the loan type, as well as the number field to post the appraisal value of the home. These two fields helped our client save about six hours every month by eliminating the need to track all the transactions in Microsoft Excel at the same time.

Additional use cases:

  • The number field can be used to track matter numbers for law firms.
  • Insurance companies can use it to track the claim number.
  • If your rate changes per customer type, you can use the field to document the rate.

#3 – Custom date field: The new date field allows the user to select a date from a pop-up calendar anywhere the field is listed. In the example provided above, we added a custom date field to our customer information to track our service contract renewal date. When we pull reports that use this feature, you will see the ability to filter by the date as well.

Additional use cases:

  • Lease renewal date for property management companies.
  • Tracking prepaid membership dates
  • Special dates that relate to your client, such as birthdate or business anniversary date.
  • Documenting the initial date of service.

#4 – Custom drop-down list: The drop-down field is by far the most powerful field type among the four options. When selected, the user will be presented with a defined list of options from which to select. By implementing the drop-down field, we were able to reduce the amount of time spent by the outside sales associates calculating their total sales and the commissions earned. Check out the Sales by Rep report at the end of the document.

Thanks to the increase of drop-down values from 25 to 100 options, this feature is even more powerful. For example, now a user could list all 50 states in United States to track sales revenue by state. If you do manage to reach your maximum number, you can deactivate old list items and replace them with new items.

Additional use cases:

  • Mortgage company: Track the loan type along with the loan amount (number field) for quarterly reporting to the state.
  • Tracking referral channels to determine where most of your new business is coming from.
  • Generate a Collection Report by sales rep.

Future opportunity: 


At the time this guide was updated (January 2021), the custom field types (date, number, drop-down), as well as the additional fields (fields 4-60) were not accessible through the SDK. This means the information entered in these new fields is not accessible through bridge applications such as Zapier and Automate.io.

Fortunately, it is just a matter of time before these fields become available through the software development kit (SDK). Intuit has already started working with premium applications like LeanLaw to provide access to these specialized fields and allow data to be passed into QuickBooks Online. When they do become available for all third party applications, I think users will be truly amazed at the power that QBO Advanced provides business owners. I am excited to see what abilities we might see soon.

Step 2: Select what category of Custom Field to use

Customer information: By selecting the customer custom field, any custom field you create will immediately become available on your customer dashboard as new columns for sorting data. The value set into these fields will automatically be included on any documents where they are used. This functionality is perfect for any company that wants to assign a specific sales rep or account manager at the client level.

Sub-customers can store their own unique values independent from the customer record.

Projects, which usually draw all information from the customer record it is linked to, will not pull in and auto fill the values on transactions. These fields will need to be manually filled in at this time.

Transaction information: The transaction-based field allows users to add specialized fields across all available transaction types.

Unlike the customer-based fields that auto populated every time based on the customer selected, the transaction information field must be set at the transaction level and is not auto populated.

Project based companies, such as interior designers, will find this feature helpful when they convert an estimate into a purchase order for a special order, or an invoice for the billable expense. By adding a custom text field, the company can list a “contact person” and have the information appear on all the linked documents.

This would allow a user to fill in a custom field on an estimate and have it transfer to both an invoice and a purchase order.

Vendor information: Like the customer fields, the vendor-based custom fields can be displayed on the vendor dashboard by adding extra columns to the table. A user can edit the vendor record to provide default values which will auto populate on the forms that the field is used on.

When you start with a custom field on a purchase order, that information will transfer over to the bill as well making it easier to track custom orders for specific clients.

While creating a new vendor, if you think of a new custom field you would like to start tracking, you can easily add the field by clicking the hyperlink “+Add custom field.”

Step 3: Select which forms and the visibility of custom fields

Initially QuickBooks Online Advanced was limited to only 10 custom fields, fortunately recent upgrades to this popular feature now provides users 12 custom fields per transaction type:

Sales:

  • Sales Receipts
  • Estimates
  • Invoices
  • Credit Memo
  • Refund Receipts

Purchases:

  • Purchase Orders
  • Expenses
  • Bill
  • Check
  • Vendor Credit
  • Credit Card Credit

Show on Forms: Currently, only three fields can be printed on any document that allows the fields to be displayed. Any more than three will only be visible through QuickBooks Online and on specific reports that have been customized to display the information. The transaction types that you can print the custom fields on are:

  • Sales Receipts
  • Estimates
  • Invoices
  • Credit Memo
  • Refund Receipts
  • Purchase Orders

Once you have selected three custom fields for any given transaction type, the toggle switch to turn on printing will be grayed out. After setting the custom field to print, you will notice a printer icon on the main custom field dashboard next to the transaction type printing was selected.

Step 4: Displaying custom fields in your workflow

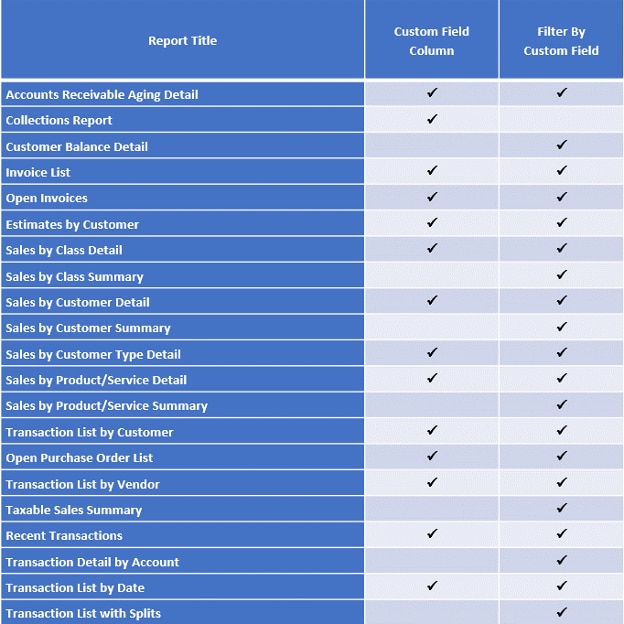
Previously, we discussed the difference between customer-based, transaction-based, and vendor-based fields. An additional benefit of the customer-based fields is the ability to display values directly within the customer screen, as well as the ability to filter by the values in custom reporting.


In the example above, we added the contract date to make it easier for us to quickly see when service contracts were scheduled to expire. This allows us to quickly see which clients we need to send renewal contracts out to and when.

You can also sort the customer list by the custom fields before exporting the data to Excel or pdf. This would make it easier to generate contact lists by sales rep.


Using custom fields in transactions: When you enter information into custom fields on an estimate, that information will transfer automatically to invoices and to purchase orders. This would allow a user to add a reference or claim number that would be automatically populated to all linked transactions. In addition, by tracking sales rep on estimates and invoices, a sales manager can calculate the closing ratio of their sales team.


Parkway quick tip: When setting the Customer Type, the only way to extend that to the projects under that customer is to do it as a batch action from the customer list.

Select the Customer and the projects that you wish to change and click on Batch Actions. Select the customer type from the drop-down and select apply.

Step 5: Optimize your reporting

Reports that use custom fields:

Custom Fields are not accessible throughout all QuickBooks Online Reports, see the section below for a list of which reports allow you to add an additional row as well as filter by custom field.

Sample reports:

Sales by customer rep custom report:

Collections report:


Get the latest to your inbox

Get the latest product updates and certification news to help you grow your practice.

By clicking “Submit,” you agree to permit Intuit to contact you regarding QuickBooks and have read and acknowledge our Privacy Statement.

Thanks for subscribing.

Relevant resources to help start, run, and grow your business.

Looking for something else?

Get QuickBooks

Smart features made for your business. We've got you covered.

Tax Pro Center

Expert advice and resources for today’s accounting professionals.

QuickBooks Support

Get help with QuickBooks. Find articles, video tutorials, and more.

How can we help?
Talk to sales 1-800-497-1712

Monday - Friday, 5 AM to 6 PM PT

Get product support