A person sitting at a table with a laptop.
product update

Moving lists from QuickBooks Desktop to QuickBooks Online

Editor’s note: This article was co-written by MB Raimondi.

If, for whatever reason, your QuickBooks Desktop company cannot (or should not) be converted directly to QuickBooks® Online (QBO), you can use the original Desktop company to populate QBO with various lists to give you a “running start.”

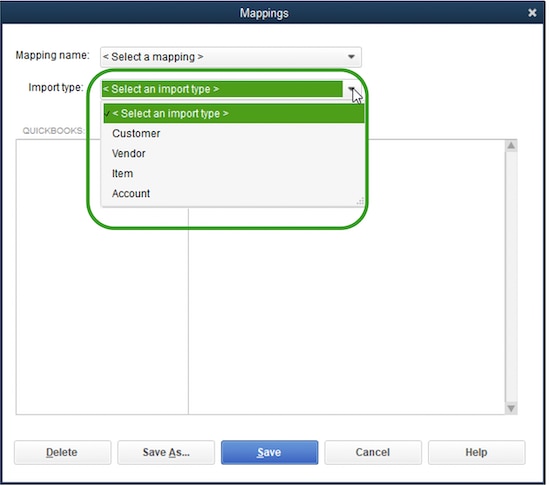
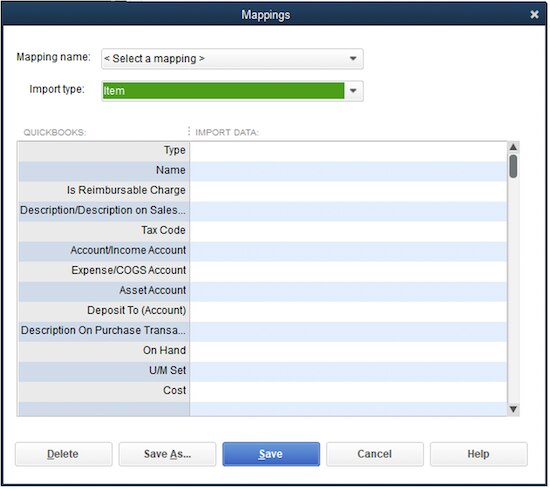
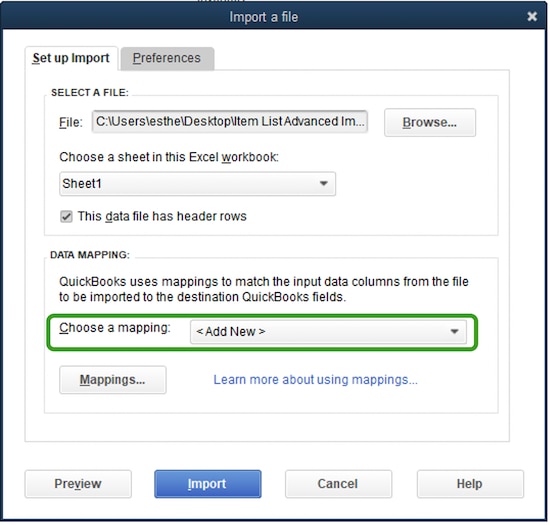
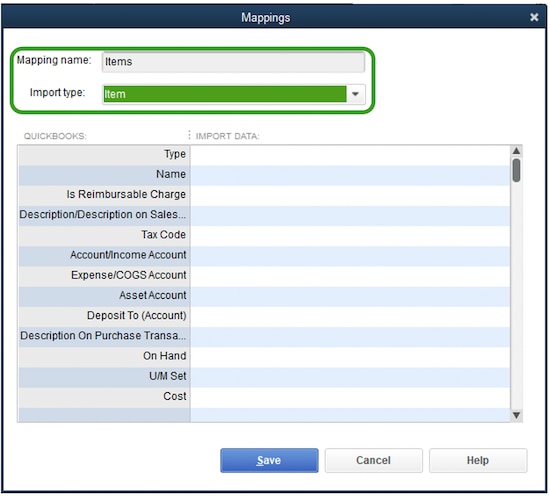
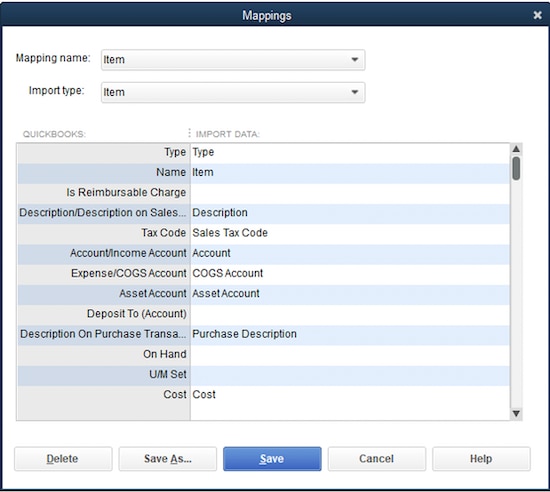
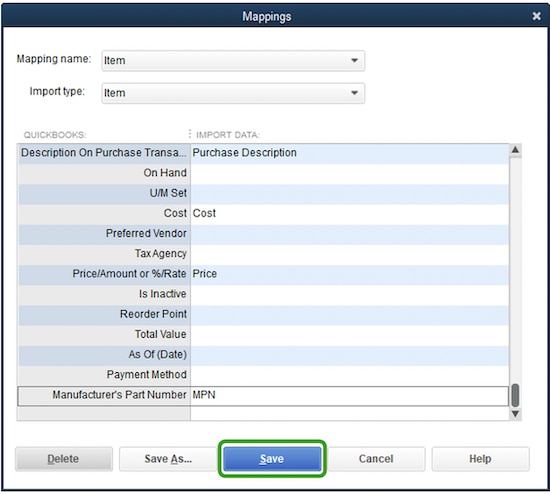
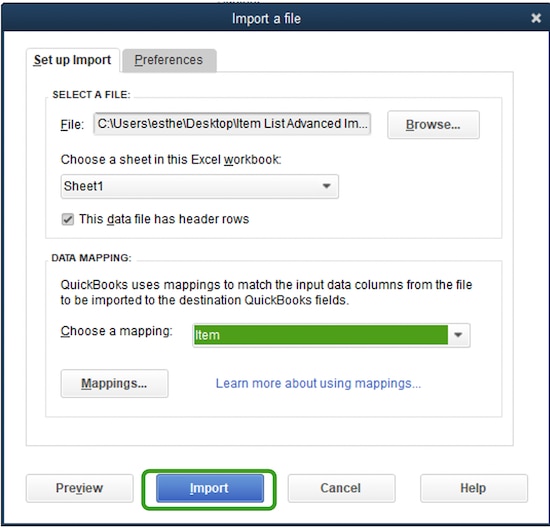
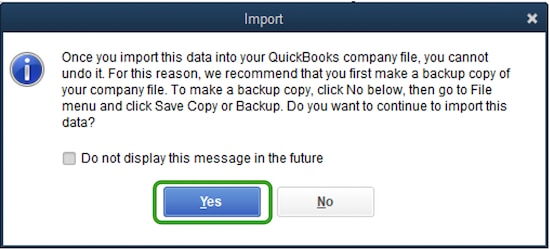
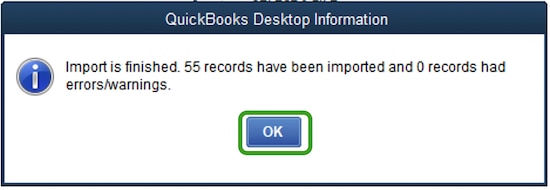
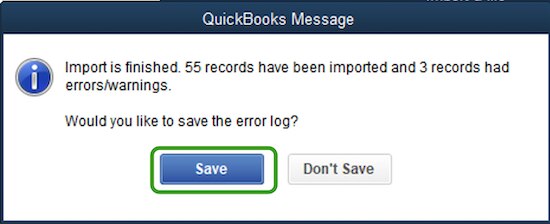
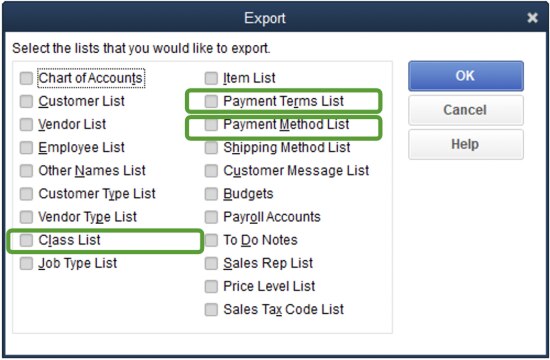
One way to set up a new QBO company is to export your lists from QuickBooks Desktop to Excel, clean them up, and use the Import Data tool in QBO to populate the lists. This works for the four main lists: Chart of Accounts, Products and Services, Customers, and Vendors. However, rather than exporting your Desktop lists and importing them directly into QBO when starting a new company, you do have other options for bringing in the lists from QuickBooks Desktop.

Note: You can learn about exporting and importing lists in the QuickBooks Desktop Migration training in your ProAdvisor® portal.

The alternative idea is to use the original existing Desktop company (that you have chosen not to convert) and create a new skeleton company with just lists and no transactions or balances. Then convert that skeleton company to QBO. If it’s done this way, you won’t have to worry about parsing addresses into their own fields or adding detail types to the Chart of Accounts.

There are two main options for creating that skeleton QuickBooks Desktop company and they are listed below, with steps starting in the original company file that you do not wish to convert directly to QBO.

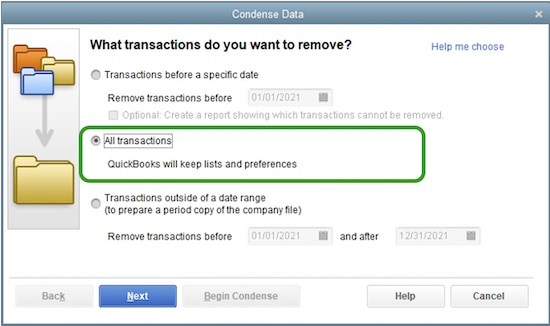
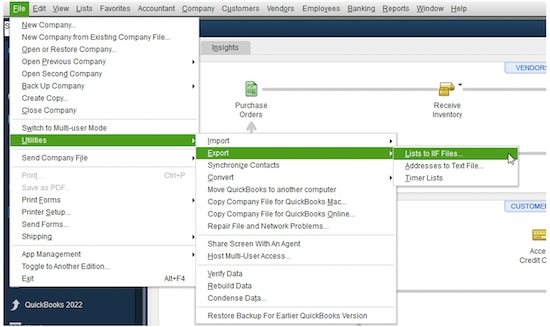
Option 1: If you have QuickBooks Accountant Desktop, make a copy of the original QuickBooks Desktop company file and, in the copy, remove all the transactions by selecting File > Utilities > Condense Data > Remove the transactions you select from your company file. Choose the transactions you want to remove > All transactions.

Note: This option appears only if you’re using QuickBooks Accountant Desktop. If you don’t have QuickBooks Accountant Desktop, look at Option 2.

Image Alt Text
Image Alt Text

Now that there are no transactions in the company file, you can clean up the lists to delete any entries (i.e., names, accounts, etc.) you don’t want to convert to QBO.

The advantage of using this method is that you get all the lists (not just the four main lists) to migrate to QBO at once. The disadvantage is that if there is a lot of cleanup to be done (removing names from lists), it has to be done manually and may take time. That being said, you could use a third-party app to help you clean up the lists.

Migrate that empty company to QBO.

Option 2: If you don’t have QuickBooks Accountant Desktop, you can export the four main lists (Chart of Accounts, Customers, Vendors, and Items) from the original Desktop company file using the list report for each list, and then create a brand-new skeleton company file that allows you to import these lists. Use the Advanced import function to bring in the various lists you’ve exported, one at a time, into the new skeleton Desktop company. Then convert that Desktop skeleton company file to QBO.

Note: When you initially create that skeleton Desktop company, do not add any suggested accounts because you will be importing the Chart of Accounts.

What follows are the steps to take for Option 2:

1. Prepare to export the various lists from the original Desktop company

  • Determine which fields can be imported into a new Desktop company using Advanced import. Initiate the import process (even though you’re not ready to import anything), so that you can see which fields are available to be mapped
  • In any QuickBooks Desktop company file, select File > Utilities > Import > Excel Files.
Image Alt Text
  • In the Add/Edit Multiple List Entries window that appears, select No. Check the box next to Do not display this message in the future, so that you don’t have to encounter this window again.
Image Alt Text
  • In the Add Your Excel Data to QuickBooks window, select Advanced Import.
Image Alt Text
  • In the Import a file dialog box, make sure that there is a valid spreadsheet (it doesn’t have to have any useful fields in it) specified in the File field and select a valid worksheet for that file, and then select Mappings to bring up the Mappings dialog box.
Image Alt Text

Select the appropriate list from the Import type dropdown to see what fields are mappable/importable:

Image Alt Text
  • Here, for example, is what appears when Item is selected from the Import type dropdown list:
Image Alt Text
  • Do this for all four lists and make a note of the available fields you want to map for each list.

2. Export the various lists from the original Desktop company

List by list, run a list report and add the fields that can be mapped for import later.

Export the Chart of Accounts

  • In the original company, turn off account numbers if they’re on, and then display the Account Listing report (Reports > List > Account Listing). If you don’t turn off account numbers, they will be imported as part of the Account name field.
  • Remove the column for Balance Total. Add a column for #, if desired.
  • Export that report to Excel.
  • Name and save that spreadsheet.
  • Open the spreadsheet and clean it up, as needed, to edit or get rid of old accounts.

Export the Item List

  • In the original company, display the Item Listing report (Reports > List > Item Listing).
  • Customize the report to add the mappable columns you need.
  • Export that report to Excel.
  • Name and save the spreadsheet.
  • Open the spreadsheet and clean it up, as needed, to edit or get rid of old items.
  • Delete all rows related to Subtotal items, Group items, Sales Tax Items, Sales Tax Groups, Inventory Assembly items, and Payment items.

Note: If you are going to import the Quantity on Hand, make sure to add the As Of (Date) to a column in the spreadsheet. Also, make sure to add a column for the Value of on-hand inventory items. Populate this with the Asset value of each inventory item, from the Inventory Valuation Summary report for that “as of” date. This can be a different value from the quantity of items multiplied by the per unit purchase cost. And be sure that your values are actual numbers, as opposed to formulas.

Export the Customer List and the Vendor List

Note: These instructions are for the Customer List. For the Vendor List, follow the same instructions, just using Vendor Contact List.

  • In the original company, display the Customer Contact List report (Reports > List > Customer Contact List).
  • Remove the columns for Balance Total and Bill to (if you see them).
  • Customize the report to add extra columns, as needed.
  • Export that report to Excel.
  • Name and save the spreadsheet.
  • Open the spreadsheet and clean it up, as needed, to edit or get rid of old names.

3. Create a new skeleton Desktop company file and import the lists

Now that the four exported list spreadsheets have been created and saved, it’s time to create a new empty skeleton Desktop company file and import those lists.

  • Select File > New Company and follow the Detailed Start steps to create a new empty skeleton file. Remember: Deselect any suggested accounts for the Chart of Accounts.
Image Alt Text
  • Back up this skeleton company (with identifying names, such as TestCo, before importing COA.QBB). Back up again before each list is imported, in case anything goes wrong and you have to restore it to a previous state.

4. Import the various list spreadsheets, one by one, into the new skeleton company

Note: The Chart of Accounts should be imported before the Item List, as the Item List uses accounts on the Chart of Accounts. We are assuming that the Chart of Accounts has already been imported, and we are illustrating importing the Item List here as an example.

Example of Import: Import the Item List into the Skeleton Desktop Company

  • Select File > Utilities > Import > Excel Files. Remember that we already turned off the message to go to the Add/Edit Multiple List Entries feature.
  • That takes you to the Add Your Excel Data to QuickBooks Choose Advanced Import on the right side.
  • You’ll see the Import a file Select Browse to find the Item Listing spreadsheet you saved earlier when you exported from the original company file. Choose the correct worksheet and make sure that there’s a checkmark in the box next to This data file has header rows.
  • Then select add new in the Choose a mapping
Image Alt Text

In the Mappings window that appears, name the new mapping and select the Import type Item.

Image Alt Text

In the Mappings window that appears, name the new mapping and select the Import type Item.

Map the columns from the Item Listing import spreadsheet accordingly.

Image Alt Text
Image Alt Text

Note: Do not map the Reorder Point column. Doing so will cause an error because the import will think that the “min” (the reorder point) is less than the “max,” even though there is no way to import a maximum quantity. So, it thinks that the “max” is 0.

  • Select Save. Make sure the spreadsheet is closed before you go to the next step.
  • You’re taken back to the Import a file Select Import.
Image Alt Text
  • There is a warning that you cannot undo the import (so, as recommended earlier, take backups of this new skeleton company file before each list is imported). Select Yes.
Image Alt Text
  • Click OK on the import information message.
Image Alt Text
  • If there were any errors/warnings regarding items that did not get imported, Save the error log, as shown in the example below. It will save to a CSV file.
Image Alt Text

Name and choose where to save the error log and select Save again. Open the error log (if one exists) in Excel to find out the issues with items that did not get imported successfully. Enter them manually, or correct the problem and import those items again.

Remember that if you import any quantities on hand, the value of those quantities will be posted to the inventory asset account and Opening Balance Equity.

5. Use IIF files to bring other lists into the Skeleton Desktop Company (optional)

The reason we suggest using Excel for the four main lists is that they are the ones most likely to require cleanup, and that is relatively easy to do in Excel prior to importing.

  • If you want to bring over additional lists (such as the Payment Method List, Payment Terms List, and the Class List), you can export them from the original Desktop company, using the Export lists to IIF function (File > Utilities > Export > Lists to IIF Files).
Image Alt Text
Image Alt Text
  • Import those lists in the resulting IIF file into the skeleton Desktop company by selecting File > Utilities > Import > IIF Files.

6. Migrate the skeleton list-populated Desktop company file to QuickBooks Online

Once the skeleton Desktop company is populated with these lists, convert that company to QBO.


Get the latest to your inbox

Get the latest product updates and certification news to help you grow your practice.

By clicking “Submit,” you agree to permit Intuit to contact you regarding QuickBooks and have read and acknowledge our Privacy Statement.

Thanks for subscribing.

Relevant resources to help start, run, and grow your business.

Looking for something else?

Get QuickBooks

Smart features made for your business. We've got you covered.

Tax Pro Center

Expert advice and resources for today’s accounting professionals.

QuickBooks Support

Get help with QuickBooks. Find articles, video tutorials, and more.

How can we help?
Talk to sales 1-800-497-1712

Monday - Friday, 5 AM to 6 PM PT

Get product support