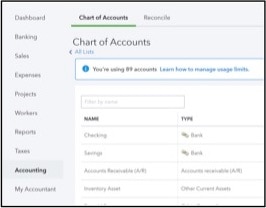
PRO-TIP: There are some default accounts created by QuickBooks according to company preferences. You can not make these accounts inactive. Learn how to manage these accounts if they’re no longer in use.
PRO TIP: Be cautious when making balance sheet accounts inactive. These accounts can be easily identified by the “View Register” option in the Action column. If there is a balance in the account and it is made inactive, QBO will post a journal entry to zero out the balance against Opening Balance Equity. You should adjust the account to zero before making it inactive.
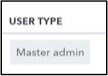
#4: Managing Classes & Locations: To add, delete, and modify classes or locations, you must be an Accountant User, Master Administrator, Company Administrator or the appropriate Custom User access. Managing these lists is quite easy. If you need to make changes, navigate to GEAR > Lists > All Lists.
Start by navigating to the Classes or Locations section:
- Select the Gear icon on the Toolbar.
- Under Lists, select All Lists.
- Choose Classes or Locations
- From here you can now edit or merge duplicate classes and locations. You can also make classes and locations inactive.
Edit a class or location:
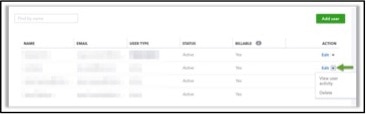
From the drop-down under the Action column, choose Edit.
Edit the desired information, then choose Save. The location and class will now be removed from the Classes or Locations list or updated with the desired information.
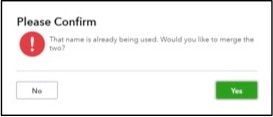
Merge duplicate classes or locations:
- From the drop-down under the Action column, choose Edit.
- In the “Name” field, change the name to the name you wish to merge into, then choose Save. The location or class will now be removed and activity merged to the remaining name.
Make a class or location inactive:
- From the drop-down under the Action column, choose Make inactive.
PRO-TIP: Projects is a new feature in QBO Plus that helps organize all the moving pieces of a project, including transactions, time, and running reports. Adding a Project to QBO creates a list of sub customers in the Customer Center and also a corresponding list of Projects in the new Projects Center. While these are indeed lists, they do not affect usage limits in QBO.
The Projects feature can be used as an alternative for the many QBO who users have been using Classes and Locations to track profitability by job. Because Projects is now available, we can guide our clients away from using valuable usage space and to adopt Projects instead.
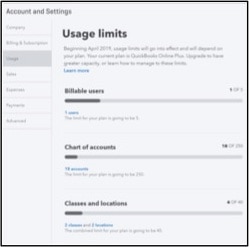
Take these steps to manage your client’s usage so they do not unnecessarily upgrade to QuickBooks Online Advanced. We can also leverage usage limits to track the growth of our client’s database.
Some of you may have a #QBOPowerUser or two on the horizon. That is the wonderful thing about QBO Advanced: This powerful new offering can now grow with our clients as they are scaling from a small to mid-sized business.