A couple reviewing information on their computer.
Running a business

QuickBooks Online Advanced for real estate property management, Part 1: Overview and setup

QuickBooks® Online Advanced is Intuit’s latest cloud-based offering designed for fast-growing, complex businesses, allowing my clients to grow and remain in the QuickBooks Online world. I love this because it means I don’t have to go out and learn a new accounting product when my customers start to expand.

This article is is Part 1 of a 3-part series that describes how to use QuickBooks Online Advanced for real estate property management. Part 1 is an overview of Advanced and who it’s for, plus details about how to get set up to work with these kinds of companies. The rest of the series will be published over the next week and URLs will be included when articles go live:

Part 2 – Entering transactions

Part 3 – Producing reports

Prefer videos to articles? I cover all three parts of this series in this video.

Editor’s note: Find out more about Seth David’s course, QuickBooks Online Advanced for Property Management.

Who’s right for QuickBooks Online Advanced?

First things first, companies that are growing and have more complex accounting needs are a good fit for Advanced. These include:

☑️ Property management? Yes!

☑️ Typically 10 – 100 employees.

☑️ Companies that are growing fast, and want to be smart and nimble

☑️ Companies with a lot of users.

QuickBooks Online Advanced allows you up to 25 users. In a real estate property management company, you might have the following users:

☑️ The owner (of course!).

☑️ Managers (many for larger property management companies with lots of properties) who need to access, for example, rent roll reports to see who needs to get a notice to pay rent or quit!

☑️ The bookkeeper.

☑️ CPAs.

What else do you get with QuickBooks Online Advanced? Let’s say you have five property managers, each responsible for their own building. You might want these property managers to have access to run those rent roll reports, but nothing else. You don’t want them to see any banking or other sensitive financial information. QuickBooks Online Advanced gives you the ability to get the right information to the right people by customizing roles and user permissions.

  • With Advanced, you also have:
  • Volume import. For instance, when getting started, you can import thousands of lines from a csv file, such as all of your monthly rents.
  • Priority Circle membership for better customer support, including:
  • A customer success manager.
  • Priority care (you go to the front of the line).
  • Complimentary online training – five online training classes.
  • Enhanced custom fields.

When I was asked by Intuit® to contribute a few (maybe more than a few) words on the subject, I was both honored and excited.

Set Up QuickBooks Online Advanced for Property Management

The basic set up for property management in QuickBooks Online Advanced doesn’t change from other versions.

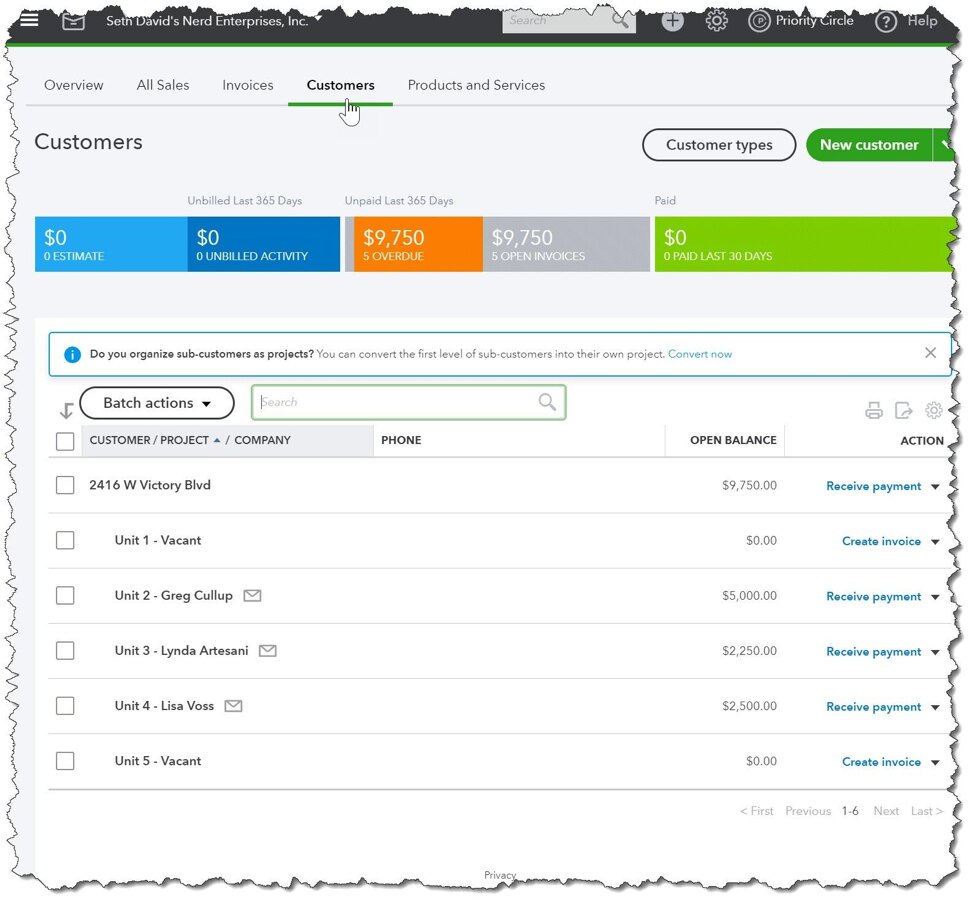
Customers or classes? The quick answer is both! The reason for using classes is reporting. Using a class for each building lets you run reports on the entire building. The reason for using customers is for tracking. With customers, I can use invoices to capture the rents even if I am not sending them to the tenants, although I don’t see why you wouldn’t email them in 2019, especially when it can be automated. You’ll set up a class for each property.

In the customer list, you set it up as follows:

  • Properties – Customers
  • Units – Sub-Customers
  • Tenants in the info areas

The units are going to be made inactive as tenants move out. Then, you will set up new versions of those units and mark them “Vacant” until you can replace them with a new tenant.

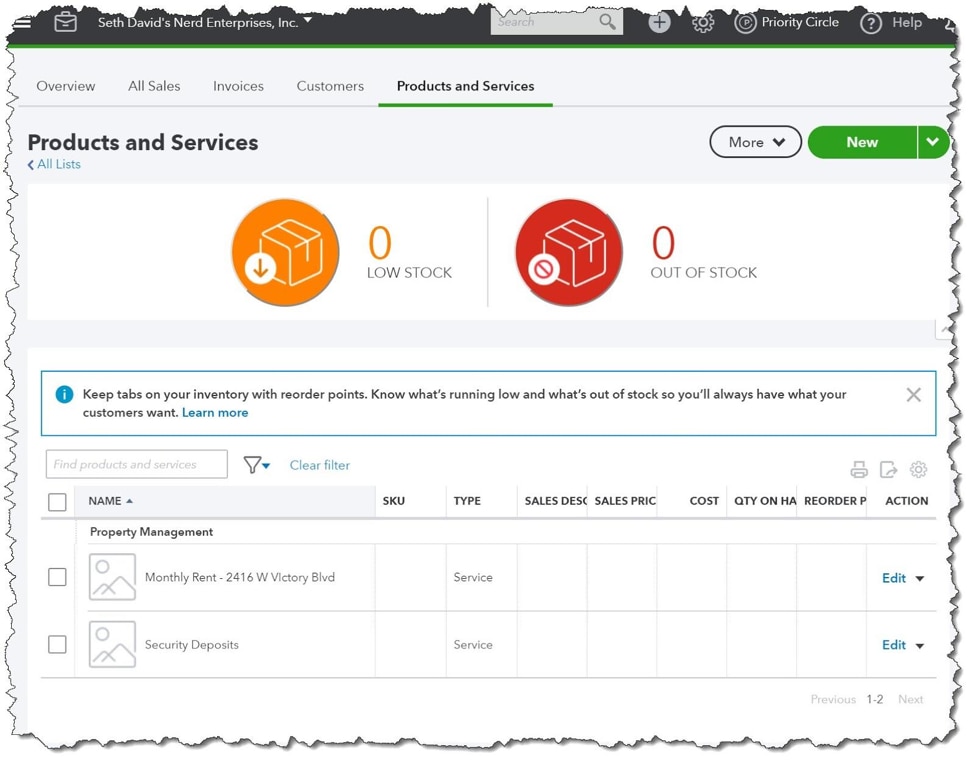
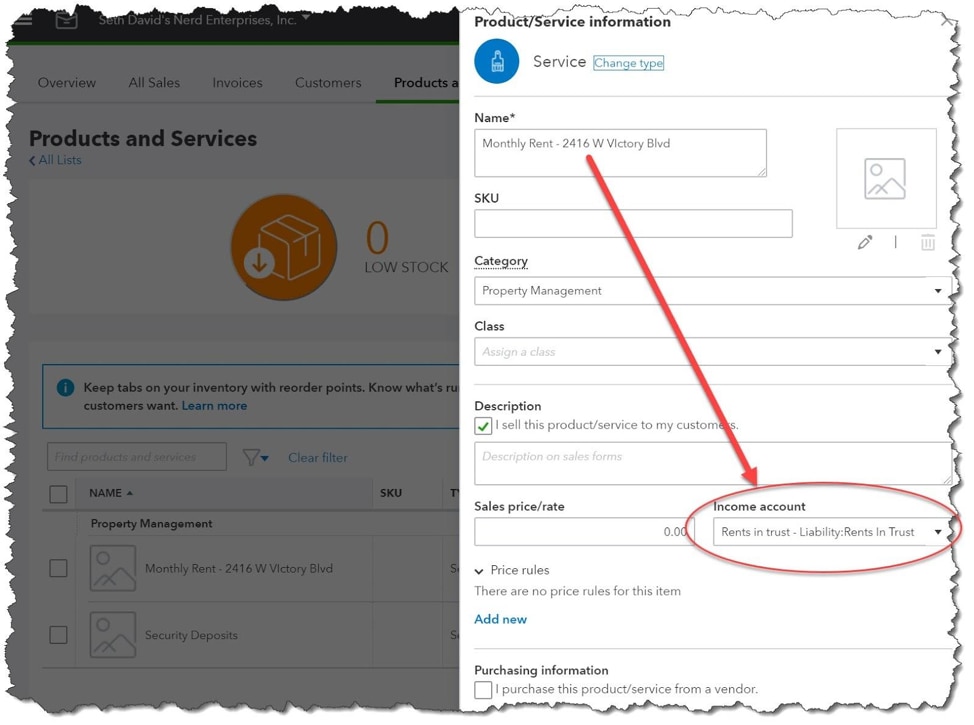
Products and services. You’ll need a Service Item for each property (you’ll see why). You will also need one Service Item for Security Deposits.

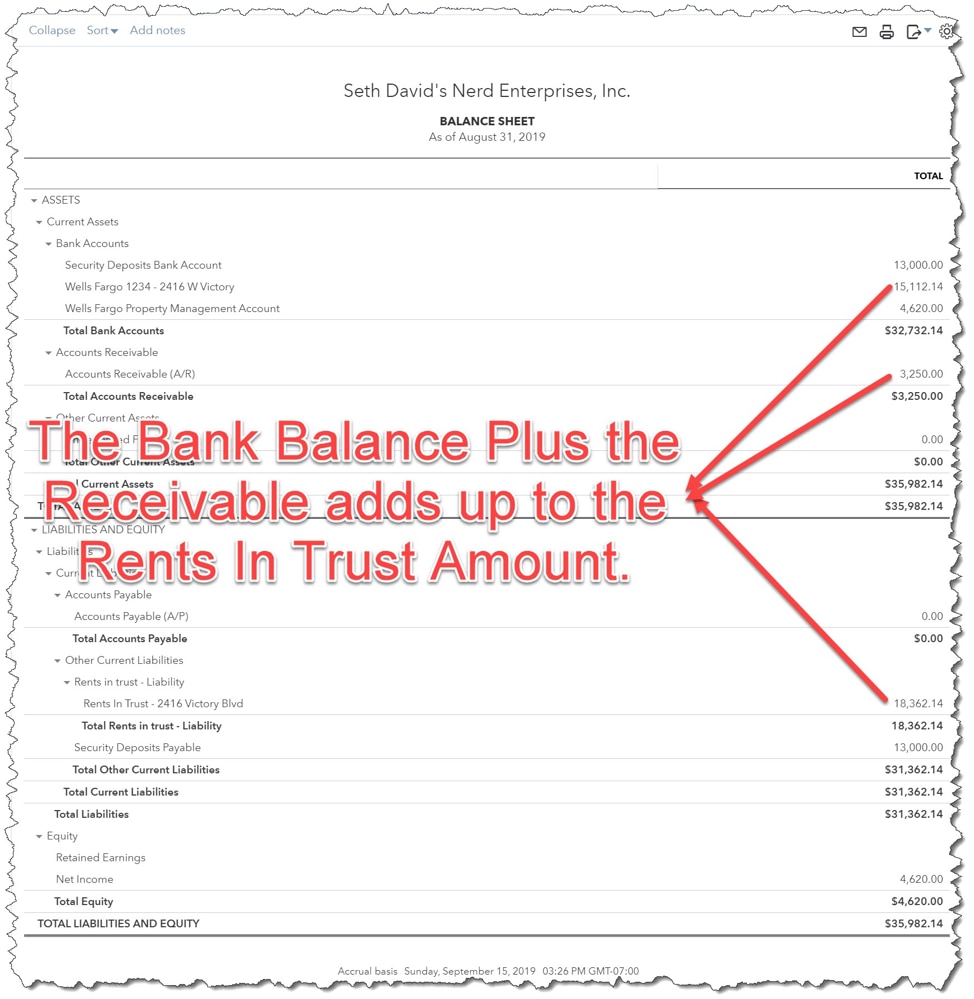
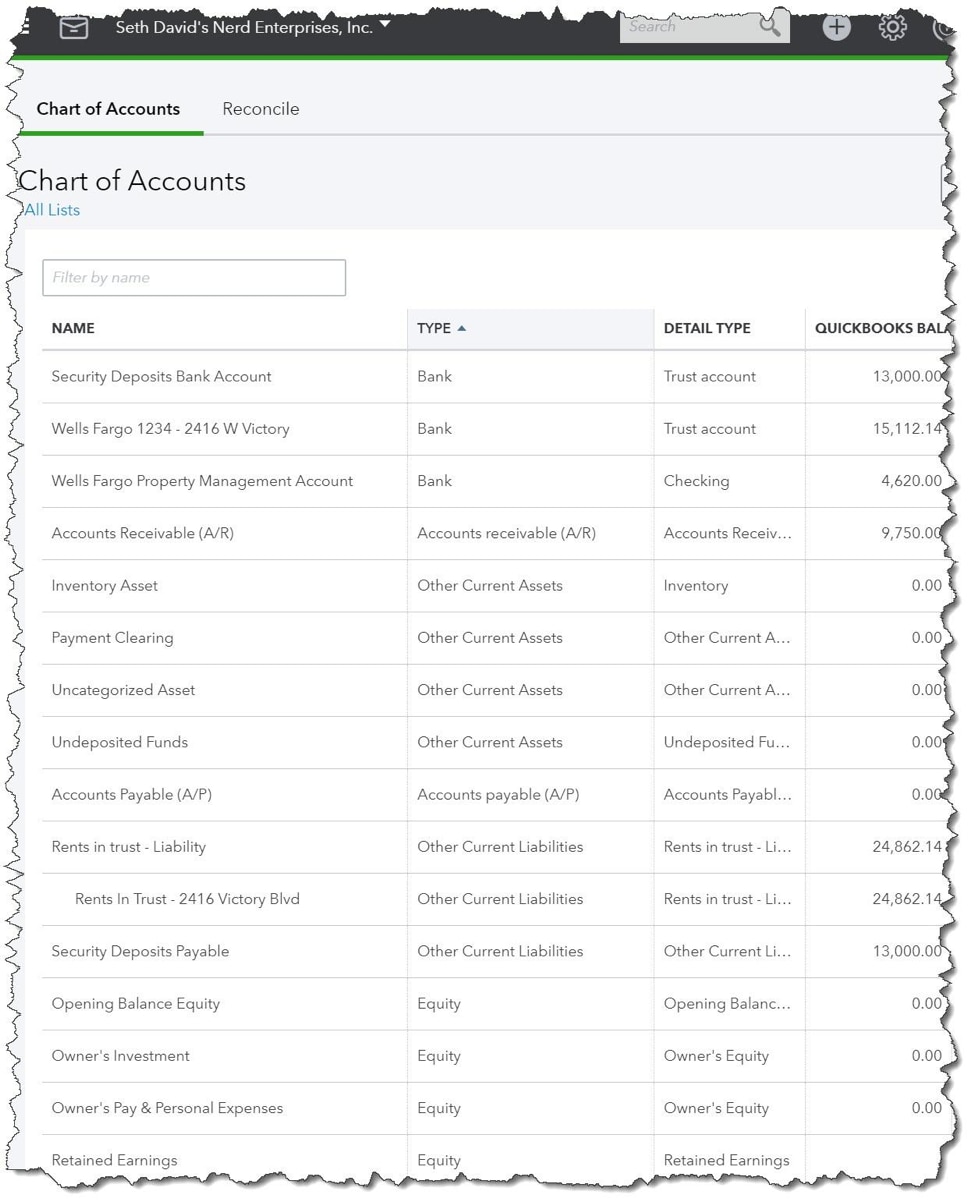
Chart of accounts. This one is going to be a little tricky for some people to wrap their heads around. I am operating on the assumption that we are managing properties that don’t belong to us. When this is the case, it means you are taking in money that doesn’t belong to you (rents), disbursing funds on behalf of the property owner, and able to account for that money, all while keeping the bank account in balance with the rents in trust liability.

We call this “trust accounting” – plain and simple. This means that substantially, everything is happening on the balance sheet. Rents come in and they go to a liability. When we pay for things on their behalf those payments reduce the liability. No income and expenses.

In many respects, this makes the accounting much easier. Everything goes through one account for each property, and each property has its own bank account. The bank account for every property needs to have the same balance as its corresponding liability account. The only exception will be unpaid invoices, where the rental amounts are mapped to the liability account.

The formula for any given property is simple: Cash in bank + Open Invoices = Liability. For each property, we’ll create a service item for Monthly Rent mapped to the property’s corresponding liability account. You only need one security deposit item, because all security deposits can go to the same security deposit liability account. Security deposits should be kept in their own bank account. In some states this is required, so you can accrue and pay interest when you return the security deposits.

Setup

The property I am going to set up is at 2416 W Victory Blvd. We need to set things up in this order:

1. Chart of accounts

2. Products/services

3. Customers and classes

The main reason for the order is you’ll need to have the accounts set up in order to set up the products and services. You can set up the accounts on the fly while you are setting up the products and services, but if you’re a planner like me, you’ll want to do it in this order.

Setting up the chart of accounts:

1. Security Deposits Payable (Other Current Liability) – one time setup, used for all properties.

2. Property Specific accounts:

  • Wells Fargo 1234 – 2416 W Victory (Bank Account)
  • Rents In Trust – 2416 Victory Blvd (Other Current Liability)

Setting up the products and services:

  • Security Deposits – Mapped to Security Deposits Payable (Other Current Liability) – one time setup, used for all properties.
  • Monthly Rent – 2416 W Victory Blvd – mapped to Rents In Trust – 2416 Victory Blvd (Other Current Liability).

Set up your customer list for 2416 W Victory Blvd:

In this example, there are five units numbered 1-5: four units have tenants and one is vacant. The set up will look like this:

  • 2416 W Victory Blvd
  • Unit 1 – Matthew Fulton (in the screenshot below he has moved out and the unit is now vacant)
  • Unit 2 – Greg Cullup
  • Unit 3 – Lynda Artesani
  • Unit 4 – Lisa Voss
  • Unit 5 – Vacant

Now, let’s dig deeper into the customer setup. You’ll want to enter your tenant’s contact information, especially phone number and email. With QuickBooks Online Advanced, you can automatically send the monthly rental invoice via email … and why not? It doesn’t cost anything extra, the tenants will appreciate the reminder so they aren’t late, and it’s good for cash flow!

In addition, you can attach the lease agreement so it’s always at close reach. There are also other documents you may want to attach. It’s always a good idea to do a walk through with new tenants and check off a checklist of items confirming the condition of the unit at move in. Then, have the tenant sign.

When the tenant moves out, you do the same thing confirming any deterioration in conditions. That’s how you document holding back some of the security deposit so you can fix things up and ready the unit for re-rental.

Both walk-through checklists can be attached to the unit in QuickBooks Online Advanced. The less time you have to spend looking for things, the more efficiently you can get things done and the more time you free up to focus on the most valuable things. Looking for a year-old lease agreement or walking through checklist is not a great use of time, especially when it can be avoided by taking 60 seconds to scan and attach that document right in QuickBooks Online Advanced.

Set up your class list:

In this case we set up the one class for 2416 W Victory Blvd. There is only the one class to set up until there’s another property.

Next steps

Of course, QuickBooks Online Advanced is also useful for other industry niches, including law firms. Check back often on the Firm of the Future blog for similar articles.


Get the latest to your inbox

Get the latest product updates and certification news to help you grow your practice.

By clicking “Submit,” you agree to permit Intuit to contact you regarding QuickBooks and have read and acknowledge our Privacy Statement.

Thanks for subscribing.

Relevant resources to help start, run, and grow your business.

Looking for something else?

Get QuickBooks

Smart features made for your business. We've got you covered.

Tax Pro Center

Expert advice and resources for today’s accounting professionals.

QuickBooks Support

Get help with QuickBooks. Find articles, video tutorials, and more.

How can we help?
Talk to sales 1-800-497-1712

Monday - Friday, 5 AM to 6 PM PT

Get product support