Take 10 minutes to make 3 simple changes: 6+ customizations to supercharge your QuickBooks Online workflow.
product update

Take 10 minutes to make 3 simple changes: 6+ customizations to supercharge your QuickBooks Online workflow

We all know that QuickBooks Online has changed—a lot. After spending the past year relearning where all our favorite features now live, most of us have finally rebuilt our muscle memory and are back to our original level of productivity, again.

Now comes the fun part … turbocharging that productivity.

The new interface isn’t just a redesign. It’s customizable, which means you can bring your most important tools to the surface, hide the features you don’t use, and arrange QuickBooks Online around the way you and your clients actually work.

Before I start showing off all the ways you can trick out your QuickBooks interface, there is one tradeoff: Once you customize each client’s file, the interfaces may no longer all look exactly alike. So if your firm depends on a standardized workflow, you should decide which settings should be consistent across every client and which ones can be personalized.

Start exploring! QuickBooks Online is hiding some surprisingly useful options in plain sight.

1. Turn bookmarks into workflow shortcuts

Bookmarks aren’t just for the pages already available in the navigation menu. Their real power is giving you instant access to pages that normally require several clicks to reach.

For example, I design an Incomplete Retainage custom report for my construction clients. Instead of navigating to Custom Reports and locating it in the list, I bookmark the report. Now it’s available from anywhere in the file.

I also bookmark the Reminders List. Usually, to get there, you have to go to Recurring Transactions and then click its button. Now I can jump directly to my list of transaction templates ready to be processed, and can instantly see what entries are still waiting to be entered for the month.

If there is a report or list you use constantly, open that page and select Bookmarks > Bookmark current page. Rename it so its purpose is obvious.

When I meet with clients, I always take a moment to ask which reports they run frequently, and show them how to bookmark them. That cements my role as their trusted advisor!

2. Pin the apps you actually use

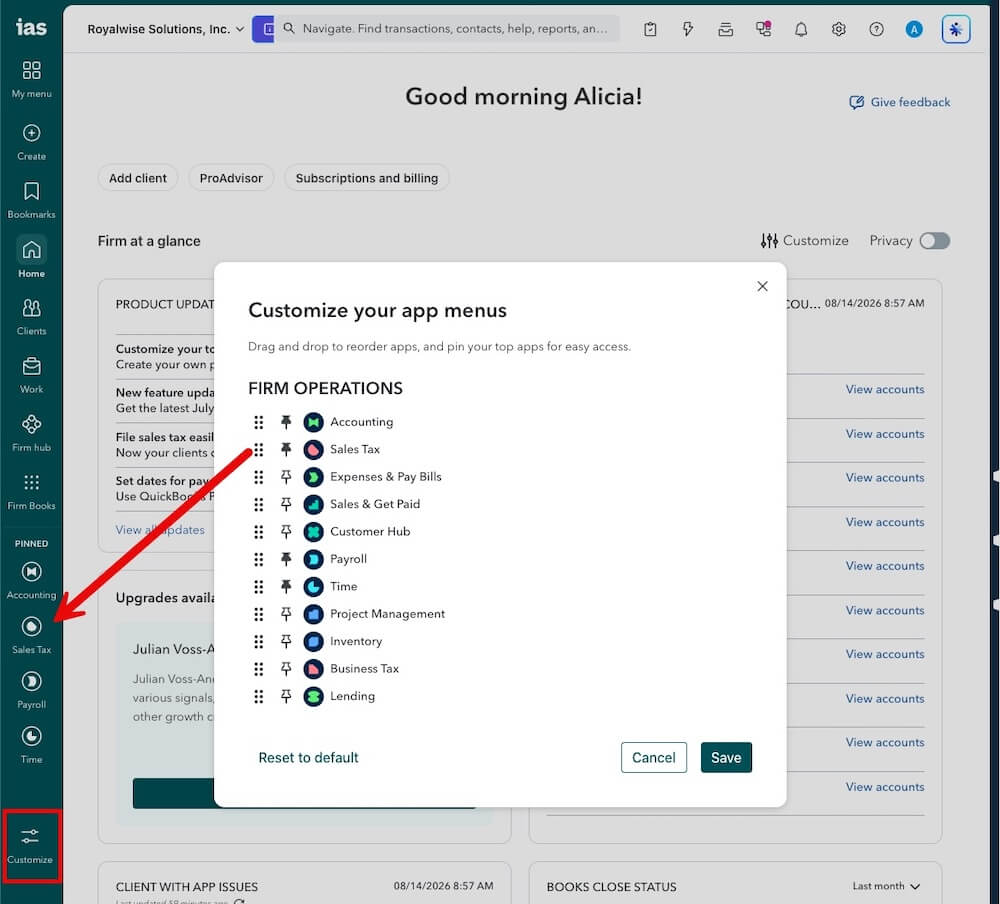
Don’t overlook the Pinned apps at the bottom of the left rail. On large monitors, you have enough room to design your own one-click navigation system.

For example, a product-based business might want inventory front and center, while a firm working heavily in payroll or sales tax may want these apps instantly available.

Select Customize at the bottom of the navigation panel to choose which apps are pinned. Drag them into order from most to least used.

This sounds like a small change, but those clicks add up. When you repeat the same navigation dozens of times a day across multiple client files, putting your most-used tools within reach makes a real difference.

My rule of thumb: Use these pinned apps for major areas of QuickBooks Online, and then add bookmarks for specific destinations inside them.
Take 10 minutes to make 3 simple changes: 6+ customizations to supercharge your QuickBooks Online workflow.

3. Make My menu your accountant command center

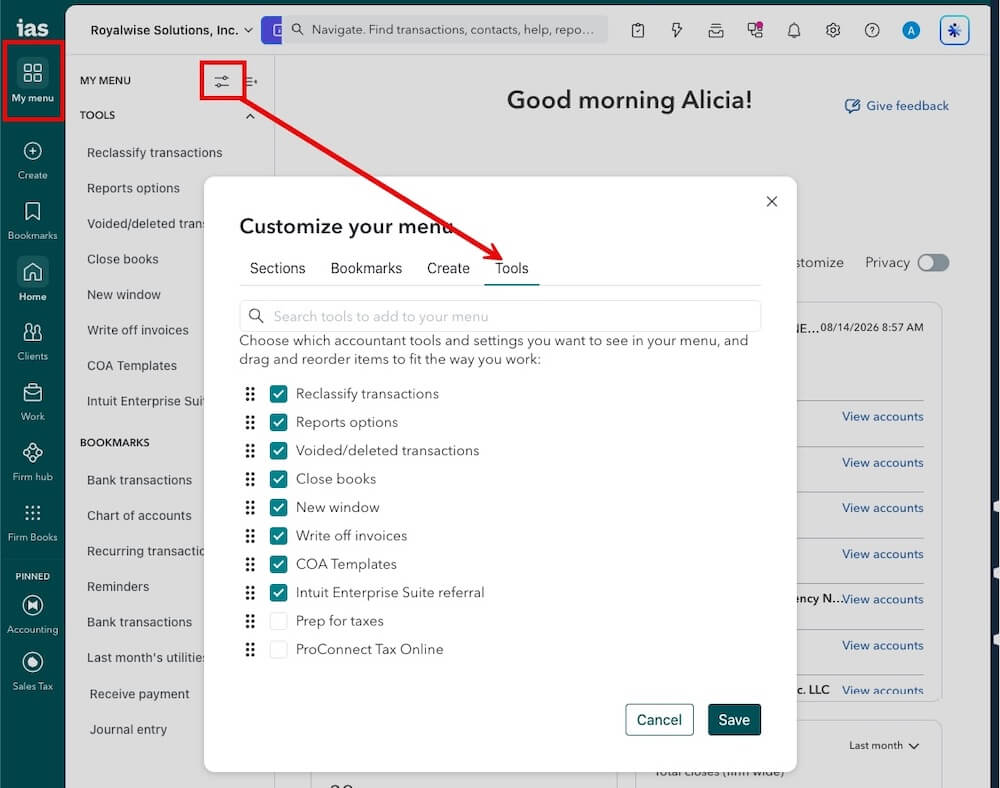
When you are signed in as an accountant user, My menu, the customizable replacement for the QuickBooks Online Accountant tools briefcase, is one of the most useful parts of the new interface.

My menu has three customizable sections:

  1. Bookmarks for pages you visit frequently.
  2. Create for transaction forms you use regularly. 
  3. Tools for accountant-specific utilities.

You can hide, display, and rearrange the sections and the individual items within them, making this the only menu you need!

Click the Customize button to open up the organizer. First, I drag Tools to the top, then I click on the Tools tab to arrange my accountant functions. I always drag Reports options and Reclassify transactions straight to the top.

Reports options, by the way, is one of QuickBooks Online's best-kept secrets. You can set the default date range and reporting basis that appear when you open reports. QuickBooks Online defaults to Last Month, but most of my clients usually prefer Year to Date. Even when a company files taxes on a cash basis, I still run accrual-basis management reports because the business still has invoices and bills that need attention.

Instead of changing those settings every single time you open a Profit and Loss or Balance Sheet, set the defaults once. The good news is that this setting DOES apply to your clients' logins, so you can do this for them as part of their onboarding process.

Reports options also give you access to a Reconciliation Status list. When I review a file, I buzz down this reconciliation list and look for stale dates and gaps. You would be astonished by how many problems I find behind the scenes that neither the bookkeeper nor the CPA noticed.

Be sure to explore the Create tab. Not only does it give quick access to standard forms, but there are additional navigation options, including Shipping Label, Contract, and Review Time.

At this time, My menu is only customizable on a per-client basis. Please put in Feedback to give us the option to deploy it once across all clients!

Take 10 minutes to make 3 simple changes: 6+ customizations to supercharge your QuickBooks Online workflow.

4. Turn the Home page into a real dashboard

A lot of people land on QuickBooks Online’s homepage and immediately leave because it feels overwhelming. Don’t settle for that; QuickBooks is trying to show you what’s possible, and you have control over what appears there.

A good dashboard should answer two questions:

  1. How healthy is the business?
  2. What needs attention next?

If a widget doesn’t help answer either question, it probably doesn’t need to be there.

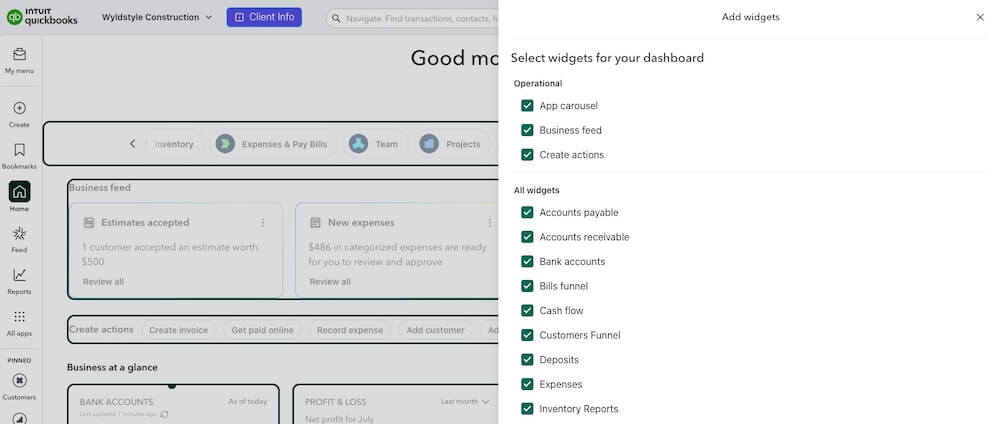
Select Customize in the upper-right corner. From there, you can add, remove, move, and resize the sections and widgets.

If you don’t use the app carousel, turn it off. If the Business Feed isn’t relevant to your workflow, hide it, but try it first; I have several clients that use its insights daily. 

Choose the data points that actually help you understand the client’s business. For many of my clients, I move the Bank Accounts widget to the first position and extend it long enough to display every account, then I arrange the Profit and Loss, Expenses, Accounts Receivable, and Sales & Get Paid widgets nearby.

Take 10 minutes to make 3 simple changes: 6+ customizations to supercharge your QuickBooks Online workflow.

You can even customize the Create actions buttons that appear across the top of the Home page by clicking Show all. If your client frequently creates Recurring sales receipts and Sales orders, turn those actions into hot buttons. If they never create purchase orders, don’t give that action valuable screen space.

As you use QuickBooks Online, its AI will learn about your most common tasks and move these buttons into place for you.

5. Use Navigate as a command bar

The search bar at the top of QuickBooks Online now says Navigate. That name is intentional. It isn’t just for looking up transactions.

You can use it to open customers and vendors, jump into registers, find transactions, and run reports. Instead of clicking through All apps, Customer Hub, and Customers, and then searching the list, type the customer’s name and go directly to their profile.

Try searching for a dollar amount with a dollar sign, such as “$100.” The dollar sign tells QuickBooks Online to look for a monetary amount instead of every occurrence of the number 100, which could otherwise include something such as purchase order 1007.

Natural-language searches can combine several criteria at once. For example: “Unpaid invoices over $500 for Sally Smith more than two months old.” That single request combines five filters for transaction type, amount, customer, payment status, and age.

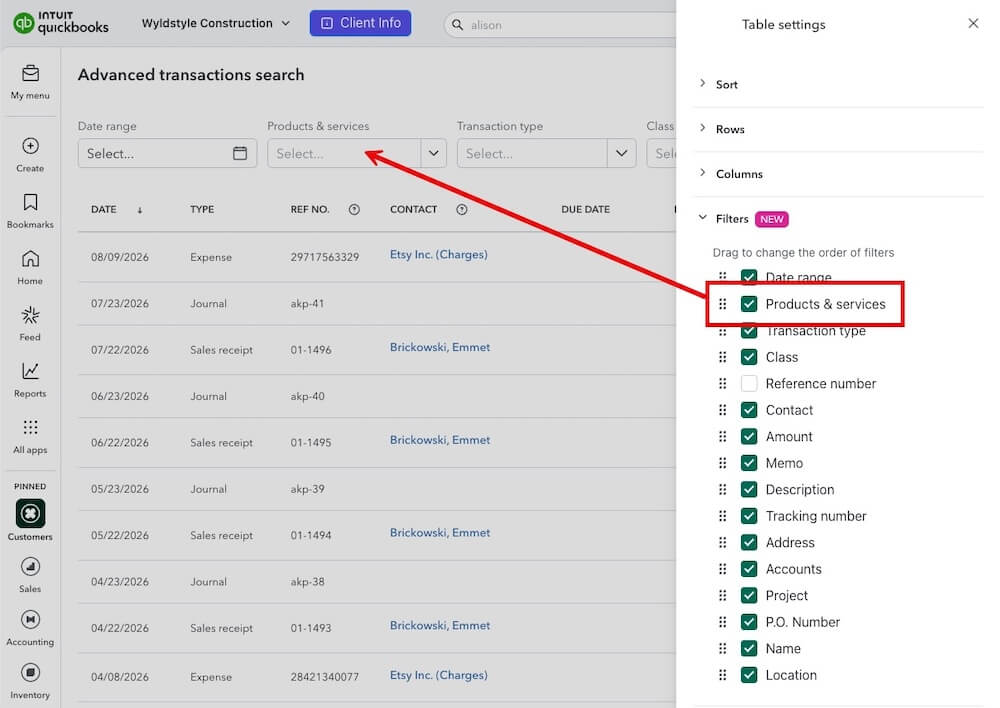
If Navigate doesn’t find what you need, open Advanced transaction search. Even the Filter bar can be customized; surface the fields you use, and even search by Products & services. Remove fields that only create visual clutter.

Take 10 minutes to make 3 simple changes: 6+ customizations to supercharge your QuickBooks Online workflow.

6. Configure the Bank Transactions grid like a pro

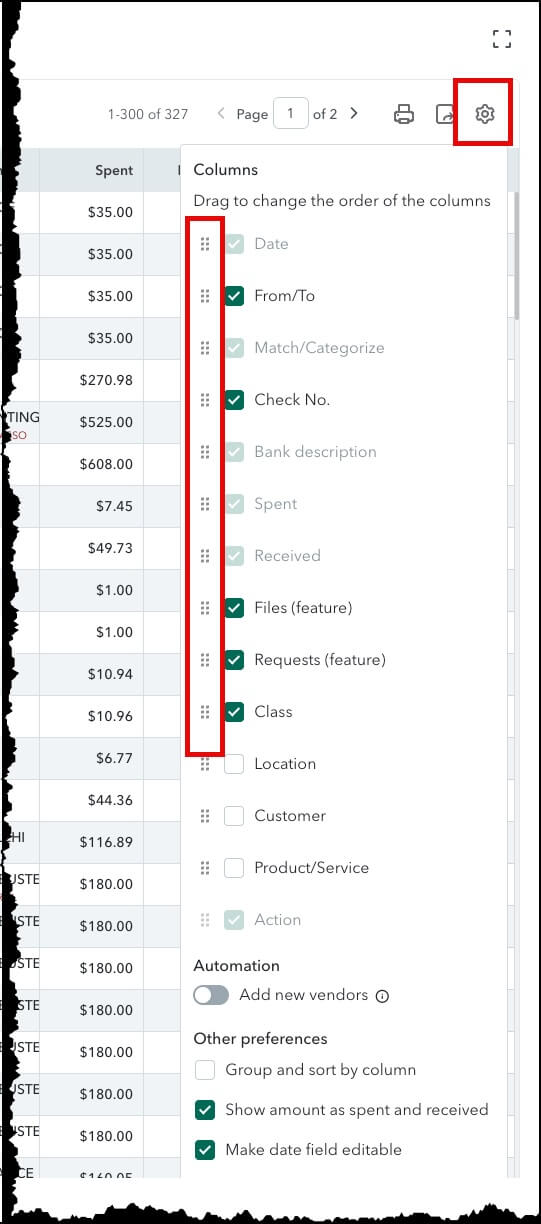
I’m a bank feeds geek. The small gear directly above the Bank Transactions grid—the “baby gear”—is where the real magic happens.

You can choose which columns appear, rearrange them, and change how transactions behave when you review them. I move the fields I edit most often, including From/To and Match/Categorize, toward the left so they are easier to see and use.

Here are my non-negotiable settings:

Make the date field editable. A transaction should be dated when it happened in real life, not when it cleared the bank. If a check was written on June 28 but cleared on July 2, those dates may fall in different reporting periods.

Show the full bank description. The grid may display a shortened or simplified description. The full description shows the information received from the financial institution and can provide clues the cleaned-up version leaves out.

Copy the full bank description to the memo. Do this. Absolutely do this. It preserves the bank’s original information inside the transaction and makes those details searchable later. You can still add your own explanation to the memo.

I usually turn off Add new vendors. I don’t need every restaurant, gas station, and one-time merchant automatically added to the Vendor list.

I also turn on the warning for a missing customer or vendor because I don’t like transactions entering the books without a name in the From/To field. Clean names make reporting, research, and 1099 review much easier.

Depending on the client, I may also:

  • Use alternating row colors for easier scanning.
  • Increase the page size to 300.
  • Hide inline matching controls if the client enters almost everything directly from the bank feed.
Take 10 minutes to make 3 simple changes: 6+ customizations to supercharge your QuickBooks Online workflow.

Start with 10 minutes

QuickBooks Online default state can be so overwhelming that your eyes glaze over. They’re showing you everything it CAN do; it’s up to you to dial it in. Explore buttons you’ve never clicked on, and mold it around the way you work.

Take 10 minutes today and make three changes:

  1. Bookmark one report or workflow you use constantly.
  2. Pin or rearrange one app in the navigation.
  3. Review the settings under the Bank Transactions grid gear.

Then repeat the exercise with your clients. Ask what they need to see when they log in, what they do most often, and where they lose time.

Most importantly, revisit these customizations as part of your quarterly or annual review. Reviewing your display options helps you stay on top of new feature releases to spot better ways to save time. Features you turned off in the past will now be helpful as the client’s business evolves.

The best QuickBooks Online setup isn’t the one with every feature turned on. It’s the one that helps the right person see the right information, perform the right action, and catch the details that might otherwise be missed.

To see these tips in action, check out my course, Customizing QuickBooks Online. The live webinar is on September 30, and the recording will be available as a self-paced course after that date.


Recommended for you

Get the latest to your inbox

Get the latest product updates and certification news to help you grow your practice.

Looking for something else?

Get QuickBooks

Smart features made for your business. We've got you covered.

Tax Pro Center

Expert advice and resources for today’s accounting professionals.

QuickBooks Support

Get help with QuickBooks. Find articles, video tutorials, and more.

How can we help?
Talk to sales 1-800-497-1712

Monday - Friday, 5 AM to 6 PM PT

Get product support